# Recipes
# Breads
# Danish Rye Bread
From: [foodgeek.dk](https://foodgeek.dk/en/danish-rye-bread-recipe/ "https://foodgeek.dk/en/danish-rye-bread-recipe/") Video: [YouTube](https://www.youtube.com/watch?v=8EanzisEiMc "https://www.youtube.com/watch?v=8EanzisEiMc")
[](https://krivis2.zygi.xyz/_detail/recipe/danish_rye_bread.jpg?id=recipe%3Adanish_rye_bread "recipe:danish_rye_bread.jpg")
Rye is a grain that thrives in the relatively cold environment in Scandinavia, so that means that bread made using rye flour is common in Denmark. This is my recipe for a dark, malty sourdough rye bread with rye kernels and pumpkin seeds.
| Prep | 0:05 |
| Cook | 5:20 |
| Yields | 1 serving |
-
50 g starter
-
100 g flour
-
100 g water
-
150 g [sourdough rye starter](https://krivis.zygi.xyz/books/recipes/page/sourdough-starter "recipe:sourdough_starter")
-
180 g rye flour
-
300 g water
-
330 g rye kernels (cracked, if you can't get these, use whole rye kernels but soak them even longer
-
170 g pumpkin seeds
-
500 g water
-
400 g levain
-
1000 g soaked seeds
-
200 g water
-
50 g malt syrup
-
400 g rye flour
-
20 g fine salt
1.
Mix all the ingredients for the levain; There will be enough levain to save for the next bread.
2.
Mix the seeds with the water and leave to soak overnight.
3.
Put 400 grams of the levain, 20 grams of salt, 50 grams of malt syrup, 400 grams of rye flour and 200 grams of water in a bowl. Whatever of the levain is left over, is your new mother rye starter. Put it in the fridge until the next time you need it.
4.
Strain whatever water hasn't been soaked by the seeds and add the seeds to the bowl.
5.
Mix the dough by hand until everything is really well incorporated.
6.
Butter a large bread pan liberally.
7.
Add the dough and level it using a wetted spatula.
8.
Leave to proof covered with a wet dish towel or cling film.
9.
A rye bread needs to rise about 30%-50% before it's put in the oven. If you put it in too early, the bread will crack on top because of too much oven spring, if you put it in too late the bread will deflate in the oven. The proofing can take anywhere from 2 to 6 hours depending on a lot of factors, like the ambient temperature, the strength of your starter, the temperature of the dough and the consistancy of the dough A good rule of thumb for when it is ready to put in the oven is when there is 6-7 pinhead sized holes on top of the dough.
10.
Heat the oven to 240°C/465°F/Gas Mark 9. When the bread is ready to bake, put it in the oven and close the door.
11.
Bake for 10 minutes, then reduce the temperature to 180°C/355°F/Gas Mark 4.
12.
Bake for another 40-70 minutes until the breads internal temperature is 98°C/208°F.
13.
Leave the bread to cool on a wire rack. Once it's cooled to room temperature, put it in zip lock bags and let it rest for a day before slicing into it.
-
50 g sourdough starter
-
100 g rye flour
-
100 g water
1.
Start by putting 100 grams of rye flour and 150 grams of water in a glass container
2.
Mix thoroughly so all the flour been hydrated
3.
Put somewhere warm to the next day (in a window in the sun or near a heater)
4. Feed.
5.
The follow this routine until you have an active sourdough starter. You know it is active when it grows to double size over four to eight hours after you've fed it
1.
Mix the sourdough starter Measure 50 grams of sourdough starter in a fresh glass container
2.
Add 100 grams of bread flour and 100 grams of water and mix thoroughly. Close the container. You can seal it if you want.
3.
Store somewhere warm (about 25°C/77°F)
4.
Repeat every day until your sourdough starter is bubbly and super active. Normally it takes six to seven days.
-
2 toasts, or 1 bagel
-
1 avocado
-
1 slice of smoked salmon
-
2 eggs
-
2 spreads of cream cheese (e.g. Philadelphia)
-
1 pinch of salt
-
1 pinch of pepper
-
1 pinch of paprika
1. Poach the eggs.
1. Fill 3/5 of the deep pan with salted water.
2. Bring it almost up to the boiling point (induction stove level 7).
3. Crack each egg in a row in a small bowl.
4. Then carefully pour it out into the almost boiling water.
5. Repeat with each egg.
6. Keep it on the heat for **2 min**.
7. Remove the pan from the heat, cover with a lid, let it rest for **1-2 minutes**.
8. Remove the poached eggs with a colander from the water.
2. Cut the bagel horizontally into halves. Roast it a little bit. Spread cream cheese on top.
3. Mash the avocado. Spread it on top of bagel halves. Add a bit of salt on top.
4. Cut the smoked salmon slice into two and place it on top of avocado layer.
5. Place poached eggs on each half. Add salt, pepper, and paprika for color. Enjoy!
| Prep | 0:10 |
| Cook | 0:30 |
| Yields | 3 servings |
-
270 g flour
-
3 eggs
-
270 g milk
-
3 pinches salt, 2-3 pinches = half a teaspoon
-
300 ml water, use pale lager beer for extra taste
1.
Pour all ingredients into a bowl. Mix everything well with a mixer. (Optionally) let it rest for up to 2 hours.
2.
Heat the (crepes) pan (better two, it's faster) to medium high heat (220 C, step 8).
3.
Slightly wet a piece of paper with sunflower oil and wipe the pan.
4.
Once the pan is hot, pour two crepe ladles worth of batter in the center of the pan and quickly tilt the pan in a circular motion to cover the whole pan with batter.
5.
When the edges of the crepe start lifting up or change color (roughly after 90 seconds), flip the crepe with a long spatula.
6.
Cook the second side for another 20 seconds to one minute.
7.
Stack the crepes on a plate, or eat them as soon as they are ready.
-
600 g milk, optionally mixed with water
-
6 tbsp (heaped) semolina flour
1.
Heat the milk up to 70 C.
2.
Add semolina flour.
3.
Mix well until the porridge thickens. Then remove from heat.
4.
Serve in a bowl with cinnamon, marmalade, or maple syroup.
| Prep | 0:10 |
| Cook | 0:10 |
| Yields | 4 servings |
-
500 g quark or tvorog (varškė)
-
5-6 tbsp flour
-
2 eggs
-
1 banana
-
1 tbsp sugar
-
1 tsp baking powder
-
a pinch of salt
1.
Add all ingredients to food processor and mix well.
2.
If it does not mix well (often happens when you use tvorog) slowly pour in some milk until it does.
3.
Heat the pan to 180C (medium, level 6 on an induction cooker).
4.
Add generously oil to the pan.
5.
Use a table spoon to pour small pancakes into the pan.
| Yields
| 1 servings (1 clay pot)
|
| Prep time
| 0:30 |
| Cook time
| 2-3 h |
### Ingredients
- 150 g lamb (ideally fatty, can be replaced with veal, or worst case pork neck, and finally chicken thighs), cut in small cubes
- 200 g eggplant (1/3 to 1/2 of an eggplant), sliced along the long side, salted and then drained
- 2 potatoes, sliced along the long side into 4-6 pieces
- 2 tomatoes, chopped
- 3 green onion leaves
- 2 cloves of garlic, cut in 4 pieces each
- 3 tbsp chopped parsley
- 1/4 tsp of grounded cumin (Kreuzkümmel, зира)
- 3 tsp Provencal herbs (thyme, oregano, rosemary)
- Salt and pepper
- 2 tbsp of olive oil
### Preparation
1. Preheat the oven to 210 degrees.
2. Apply the oil to the clay pot.
3. Arrange the eggplant slices on the sides.
4. Place the meat at the bottom of the dish in the center of the eggplant circle. Season with salt, pepper, and cumin.
5. Place a layer of the potatoes on top of the meat.
6. Then place the cloves of garlic.
7. Then place tomatoes.
8. Season with salt, pepper, onion, and herbs.
9. Put the pot to the oven. For 2-3 h.
# Gefüllte Peperoni
From: [bettybossi.ch](https://www.bettybossi.ch/de/Rezept/ShowRezept/BB_BBZF180615_0011A-40-de?title%3dGefuellte-Peperoni "https://www.bettybossi.ch/de/Rezept/ShowRezept/BB_BBZF180615_0011A-40-de?title%3dGefuellte-Peperoni")
[](https://krivis2.zygi.xyz/_detail/recipe/gefuellte_peperoni.jpg?id=recipe%3Agefuellte_peperoni "recipe:gefuellte_peperoni.jpg")
Tasty long papers filled with ground beef.
| Prep | 0:15 |
| Cook | 0:15 |
| Yields | 4 servings |
-
8 spitz-peperoni, long capsicums
-
1 tsp salt
-
3 tbsp oil
-
2 onions
-
2 tomatoes
-
125 g olives
-
100 g mozzarella
-
1 tbsp oil
-
400 g ground beef
-
4 branches of fresh oregano
1.
Heat the oven to 220.
2.
Halve the capsicums, remove the seeds, and place on the baking paper.
3.
Add oil on top of the capsicums and bake for 10 minutes.
4.
Cut the onions finely.
5.
Cut the tomatoes in cubes.
6.
Cut olives in rings.
7.
Add oil to the pan.
8.
Fry olives, onion, and meat for 2 minutes.
9.
Add tomatoes and salt to the pan then mix well.
10.
Take out the capsicums from the oven and put the filling into the capsicums.
11.
Top the capsicums with mozzarella.
12.
Put the capsicums back to the oven for 10 more minutes.
13.
Finally, top cooked capsicums with the fresh oregano.
-
1.3 kg potatoes
-
2 onions
-
2 eggs
-
250 ml milk
-
200 g smoked bacon, in cubes
-
0.5 tbsp salt
-
0.5 tsp black pepper
1.
Finely grate potatoes and onions together.
2.
(Optionally) half of the onions may be fried with the bacon instead.
3.
Combine all ingredients and mix them well. Fill the baking form with the mixes mass and bake it in the pre-heated to 180 C oven for 90 minutes or until the sides become brownish and the top golden.
| Prep
| 1:00
|
| Cook
| 2:00 |
| Yields
| 8 Servings |
Moussaka is by far the most popular Greek dish worldwide. It's a very tasty casserole, and one of the top Greek comfort foods.
### Ingredients
Middle layer:
-
500 g ground beef
-
600 g (2 big) tomato, grated
-
160 g (1 medium) green capsicum (or carrots), finely chopped
-
280 g (2 middle sized) onion, finely chopped
-
4 garlic cloves, finely chopped
-
250 ml (.5 cup) wine
-
1 teaspoon cinnamon powder
-
250 ml (.5 cup) olive oil
-
salt and pepper
-
440 g potato, cut into thin slices
-
360 g eggplant, cut into thin slices
-
500 ml (1 cup) olive oil
-
60 g (4 tablespoons) flour
-
100 g tablespoons butter
-
750 ml (1.5 cups) milk in room temperature
-
0.5 teaspoon nutmeg
-
80 g Graviera cheese, grated
-
1 salt
1.
Preheat the oven to 200 C.
2.
Slice the eggplant. Add it to a bowl, add generously salt and mix well. Set it aside to let the salt extract the bitter juice.
3.
Slice the potatoes. Cover all the bottom of the baking pan with potatoes. Spread olive oil then add salt and pepper. Bake it in the oven for 20 mins.
4.
Chop the onions, garlic, and bell pepper.
5.
Add the olive oil in a medium-sized pan, on medium to high heat. Once hot add the onion and the capsicum. Saute for 2 minutes.
6.
Add ground beef. Continuously stir and cook until all moisture evaporates (about 3 minutes).
7.
Reduce the heat to medium and add the garlic, the cinnamon, salt, and pepper. Cook, stirring often, for 4 minutes
8.
Add the wine, and tomato. Cook about 10 minutes, until all moisture evaporates. While it's cooking, Pour away all liquid juice from the eggplant bowl. Squeeze eggplant to the bottom of the bowl to squeeze a bit more juice. Start cooking the Béchamel sauce.
9.
After the potatoes spent 20 minutes in the oven, take it out. **Add slices of eggplant on top of the potatoes**, add olive oil, salt, and pepper. **Put it back to the oven for another 20 mins**. Then take out of the oven.
10.
Prepare the Béchamel sauce.
1. Take a pot (on the scale) and add the required amount of butter, flour, salt and nutmeg!
2. In a separate bowl pour milk and heat it to 60-70 C.
3. Put the pot with butter and flour on medium heat and stir continuously until the butter melts and everything combines.
4. Pour in the hot milk, continue stirring until Béchamel reaches the desired creamy consistency.
11.
Add beef on top of the eggplant, then add bechamel, and sprinkle cheese on top of it.
12.
Put it to the oven for another 20 minutes.
1.
Add the olive oil in a medium-sized pan, on medium to high heat. Once hot add the onion and the capsicum. Saute for 2 minutes.
2.
Add ground beef. Continuously stir and cook until all moisture evaporates (about 3 minutes).
3.
Reduce the heat to medium and add the garlic, the cinnamon, salt, and pepper. Cook, stirring often, for 4 minutes
4.
Add the wine. Continue cooking for 2 minutes more
5.
Add the tomato. Cook about 10 minutes, until all moisture evaporates.
1.
Add the olive oil in a medium size pan, put it on high heat.
2.
Fry the potatoes for about 3-4 minutes (turn once). Don't to fry the potatoes all the way through. They need to be soft but not completely done.
3.
Remove them from the pan and let them drain on paper towel.
4.
Then fry the eggplants for 2 minutes (turn once). Don't to fry the eggplants all the way through. They need to be soft but not completely done.
5.
Remove from the pan and let them drain on a paper towel as well.
1.
Melt the butter in a small pot on medium to high heat.
2.
Slowly add the flour, while constantly whisking. The butter must be completely absorbed by the flour, forming a thick mixture.
3.
Reduce the heat to medium and slowly pour the milk into the pot, constantly whisking.
4.
Add the nutmeg and the salt.
5.
Cook, until you get a not too thick., creamy result.
1.
Put the fried potatoes in the bottom of a small baking pan, then add on top of them the fried eggplants.
2.
On top of the eggplants spread the ground beef.
3.
Pour the bechamel sauce into the baking pan on top of the ground beef.
4.
Sprinkle with the cheese.
5.
Baking. Put the baking pan in the oven, in the middle rack at 180°C for 50 minutes.
6.
Remove the pan from the oven and leave aside for at least 30 minutes to chill before serving.
1. Heat the oven to 200C.
2. Take a shape of ~29-30cm, put the dough in it and shove it to the oven for 5-10 minutes.
3. Cut the aubergines into bit sized pieces, place it on an oven tray, and cover in salt. Let it rest for 15 minutes.
4. Finely chop the onion and garlic.
5. Cut the rest of the vegetables. Prepare them for grilling by placing them on an oven tray. Brush olive oil onto them. Sprinkle salt and pepper to taste. (For dried oregano, for fresh, see below) Sprinkle oregano on top of tomatoes.
6. Remove the excess liquid from the aubergines, brush olive oil generously, add pepper to taste.
7. Shove the vegetables to the oven. Switch the oven to the fan mode.
8. In the meantime fry onions with the garlic.
9. Once everything is ready, assemble. To the form with a dough add onions, aubergines, bell pepper, carrots, and tomatoes. (In case of fresh oregano) sprinkle the chopped fresh oregano on top.
10. Beat eggs with milk, add salt and pepper to taste. Carefully pour them onto the vegetables.
11. Sprinkle the cheese on top.
12. Switch the oven to heating mode (switch off the fan). Shove the quiche to the oven for around 30 minutes until readiness.
13. Let it rest for 10 minutes before serving.
1. Heat olive oil over medium heat in a large, heavy skillet and add onions. Cook, stirring often, until tender, about 5 minutes. Add a generous pinch of salt and continue to cook 3 to 5 minutes, until beginning to color. Add cabbage and cook, stirring often, until cabbage wilts, about 5 minutes. Add another pinch of salt and caraway seeds and continue to cook for another 5 to 10 minutes, until cabbage is sweet, cooked down, lightly colored and very tender. Taste, adjust salt, and add freshly ground pepper. Remove from heat.
2. Preheat oven to 180 degrees.
3. Beat together egg yolks and eggs in a medium bowl. Set tart pan on a baking sheet to allow for easy handling. Using a pastry brush, lightly brush the bottom of the crust with some of the beaten egg and place in the oven for 5 minutes. (The egg seals the crust so that it won’t become soggy when it comes into contact with the custard.)
4. Add salt, pepper, and milk to remaining eggs and whisk together.
5. Spread cabbage and onion in an even layer in the crust. Sprinkle cheese evenly on top. Very slowly pour in the egg custard over the filling. If your tart pan has low edges, you may not need all of it to fill the quiche, and you want to keep the custard from spilling over. Place quiche, on baking sheet, in oven and bake for 30 to 35 minutes, until set and just beginning to color on top. Remove from oven and allow to sit for at least 10 minutes before serving.
Tip- *Advance preparation*: You can make the cabbage and onion filling up to 3 days ahead. Keep uncovered in the refrigerator so that moisture evaporates (otherwise the liquid will dilute the custard). The quiche will keep for 3 or 4 days in the refrigerator.
# Lasagne
From [bettybossi](https://www.bettybossi.ch/de/Rezept/ShowRezept/BB_BKXX060801_0090A-40-de)
[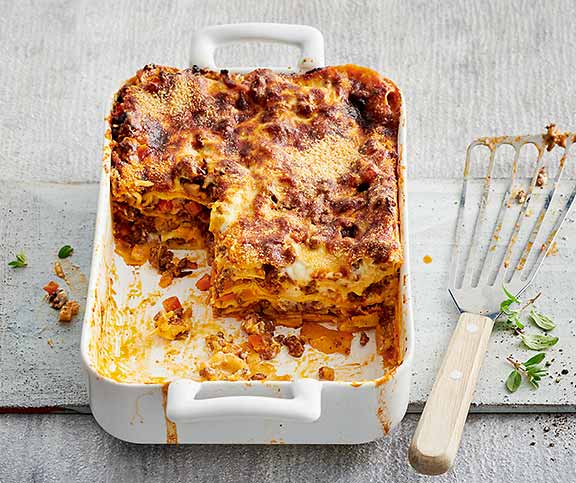](https://krivis.zygi.xyz/uploads/images/gallery/2024-10/bb-bkxx060801-0090a-x.jpg)
#### Ingredients
| 400 g | Rüebli |
| 400 g | Sellerie |
| 4 | Zwiebeln |
| 4 | Knoblauchzehen |
| 2 Zweiglein | Majoran |
| 2 Zweiglein | Rosmarin |
| | Öl zum Braten |
| 1200 g | Hackfleisch (Rind) |
| 150 g
| cubetti di pancetta
|
| 8 EL | Tomatenpüree |
| 6 dl | Rotwein (z.B. Chianti) |
| 8 dl | Fleischbouillon oder 1 Dose gehackte Tomaten (ca. 400 g) |
| | Salz, Pfeffer, nach Bedarf |
| 50 g | Butter |
| 6 EL | Mehl |
| 12 dl | Milch |
| 1.5 TL | Salz |
| wenig | Pfeffer |
| 30 | Lasagne-Blätter |
| 140 g | geriebener Parmesan |
#### Method
- Gemüse schälen. Rüebli und Sellerie in Würfeli schneiden oder grob reiben. Zwiebeln fein hacken, Knoblauch pressen. Majoran und Rosmarin fein schneiden.
- Wenig Öl im Brattopf heiss werden lassen. Fleisch portionenweise je ca. 2 Min. anbraten. Herausnehmen, Hitze reduzieren, Bratfett auftupfen, evtl. wenig Öl beigeben. Pancetta mit Zwiebeln und Knoblauch andämpfen, Tomatenpüree kurz mitdämpfen. Rüebli und Sellerie beigeben, kurz weiterdämpfen. Wein und Bouillon dazugiessen, aufkochen, Hitze reduzieren. Majoran und Rosmarin mit dem Fleisch wieder beigeben, mischen, zugedeckt ca. 30 Min. köcheln, würzen.
- Butter in einer Pfanne warm werden lassen. Mehl beigeben, unter Rühren mit dem Schwingbesen dünsten, das Mehl darf dabei keine Farbe annehmen. Pfanne von der Platte nehmen. Milch dazugiessen, unter Rühren aufkochen, Hitze reduzieren, würzen, bei mittlerer Hitze unter gelegentlichem Rühren ca. 10 Min. köcheln, bis die Sauce sämig ist.
- Ofen auf 200 Grad vorheizen. 4 EL Béchamelsauce in der vorbereiteten Form (5L order 2x 2.5L) verteilen. Lasagne-Blätter, Fleisch- und Béchamelsauce lagenweise in die Form schichten, mit Béchamelsauce abschliessen. Käse darüberstreuen.
- Backen: ca. 35 Min. in der unteren Hälfte des Ofens. Herausnehmen, ca. 5 Min. ruhen lassen, Lasagne anrichten.
# Chicken & Quinoa Broccoli Casserole
[](https://krivis.zygi.xyz/uploads/images/gallery/2025-03/image-1741081306044.webp)
A **nutritious, protein-packed** casserole that’s creamy, cheesy, and satisfying.
This recipe uses **pre-cooked quinoa and chicken** but skips pre-cooking the broccoli to save time.
It’s perfect for meal prep and a family-friendly dinner!
## Recipe Details
| Yield | Prep Time | Cook Time | Total Time | Calories (per serving) |
|---------|----------|-----------|------------|-------------------------|
| 6 servings | 15 minutes | 35-40 minutes | ~50-55 minutes | ~400 kcal |
---
## Ingredients
#### **Main Ingredients:**
- **250g quinoa** (uncooked) → **500g cooked quinoa**
- **450g cooked chicken breast**, shredded (or rotisserie chicken)
- **300g broccoli florets**, chopped (raw, not pre-cooked)
- **300g Greek yogurt** (or cottage cheese)
- **180ml low-sodium chicken broth**
#### **Seasonings & Toppings:**
- **170g shredded cheddar cheese** (plus extra for topping)
- **50g Parmesan cheese** (optional, for extra flavor)
- **50g whole wheat breadcrumbs** (optional, for crunch)
- **1 tsp garlic powder**
- **1 tsp onion powder**
- **¾ tsp salt**
- **½ tsp black pepper**
- **½ tsp paprika** (optional)
---
## Instructions
#### **1. Preheat Oven**
- Set to **190°C (top/bottom heat) or 175°C (fan-assisted).**
- Grease a **33x23 cm** baking dish.
#### **2. Cook Quinoa**
- Rinse **250g quinoa** under cold water.
- Cook according to package instructions.
- Set aside (**should yield ~500g cooked quinoa**).
#### **3. Cook Chicken (If Not Using Rotisserie)**
- If using **raw chicken**, cook in a pan over medium heat for **8-10 minutes** (or boil for **15 minutes**), then shred.
- If using **rotisserie chicken**, shred directly.
#### **4. Assemble Casserole**
- In the baking dish, mix **cooked quinoa, shredded chicken, raw broccoli, garlic powder, onion powder, salt, pepper, and paprika**.
- Stir in **Greek yogurt and chicken broth** for creaminess.
- Sprinkle **cheddar and Parmesan cheese** on top.
#### **5. Bake (Covered)**
- Cover with foil and bake for **25-30 minutes** until bubbly and broccoli is tender but still slightly crisp.
#### **6. Remove Foil & Add Crunch (Optional)**
- If using **breadcrumbs**, sprinkle them on top.
- Bake **uncovered for 10 more minutes** until golden brown.
#### **7. Rest & Serve**
- Let sit for **5 minutes** before serving.
# Desserts
# Angel Food Cake
From [Adam Ragusea](https://www.youtube.com/watch?v=HsMzE2MwN8o)
[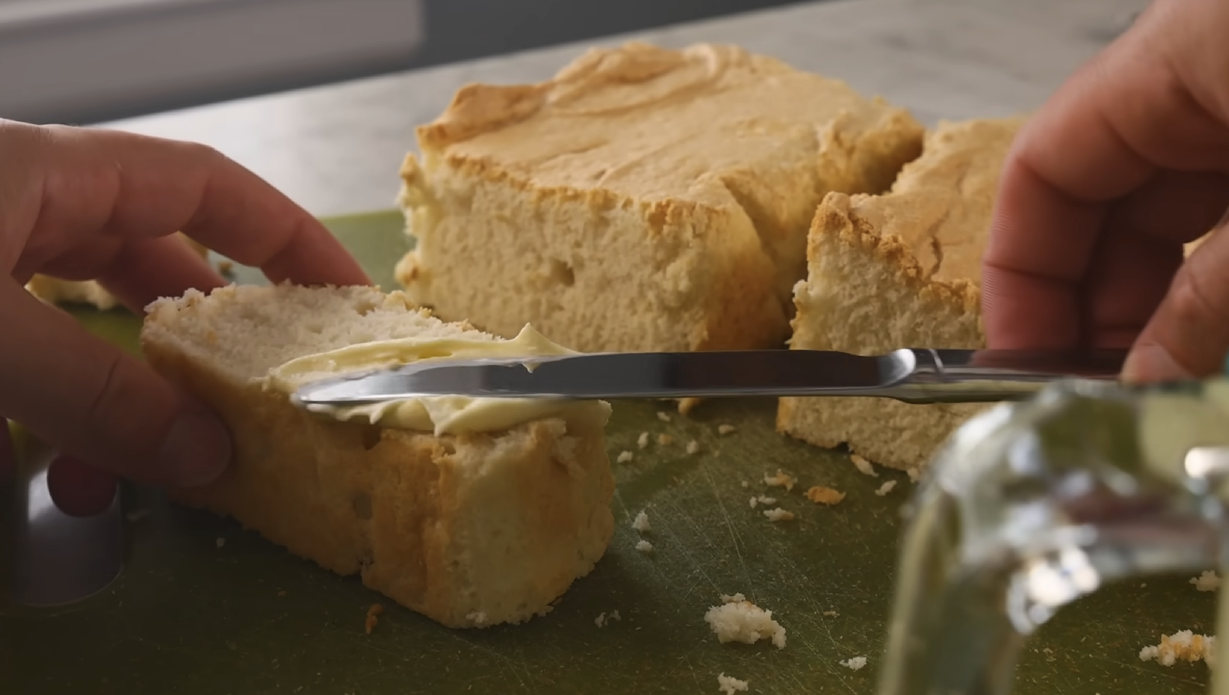](https://krivis.zygi.xyz/uploads/images/gallery/2023-12/image.png)
I have leftover egg whites. Should I just throw them away? Try the angel food cake instead!
### Ingredients
- 5 egg whites
- 1/2 teaspoon cream of tartar (or a squeeze of lemon juice)
- 175 g granulated sugar
- 1/2 cup (60g) flour (cake flour, ideally)
- salt
- vanilla (or some other extract)
### Instructions
- Bake this in a narrow pan — one big loaf pan, or two smaller ones would be good. Line the pan entirely with parchment paper before you start on the batter. Get the oven heating to 350ºF/180ºC.
- Put the cream of tartar in the egg whites and beat to stiff peaks. Gradually beat in the sugar until the foam is stiff again. Beat in a pinch of salt and a splash of vanilla. Beat in the flour until the mixture is just homogenous — no longer.
- Scrape into the pan and bake until a skewer to the center comes out clean — about an hour, but it'll depend on the dimensions of your pan. Let cool thoroughly before taking it out of the pan and peeling off the parchment paper.
- A serrated knife is good for slicing. I like eating it plain, but you could top it with whipped cream, berrie.
# Banana Bread
From: [cookidoo](https://cookidoo.ch/recipes/recipe/de-CH/r69073 "https://cookidoo.ch/recipes/recipe/de-CH/r69073")
[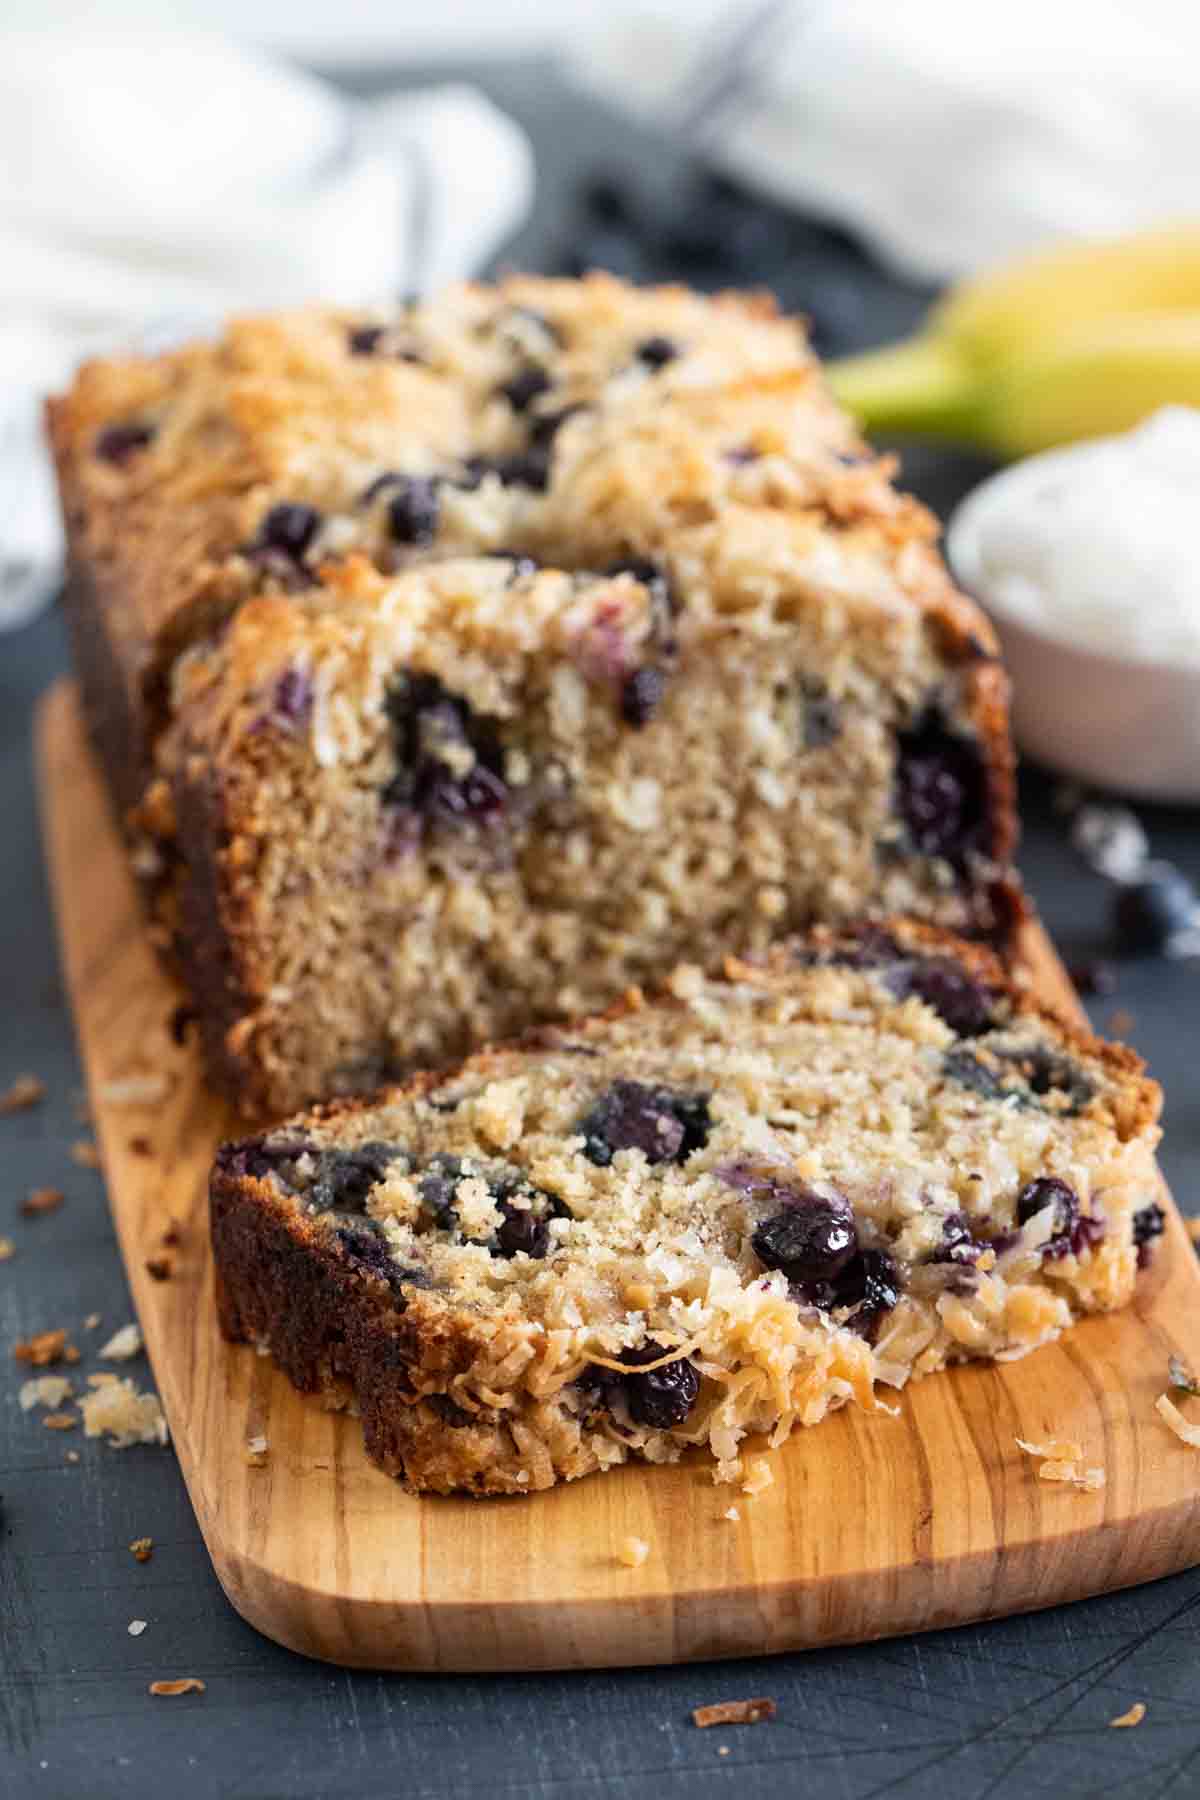](https://krivis.zygi.xyz/uploads/images/gallery/2023-12/blueberry-banana-bread-coconut-6.jpg)
Eine ganze Welt voller Thermomix® Rezepte – Cookidoo® bringt Köstlichkeiten aus aller Welt zu dir nach Hause. Eine riesige Auswahl an Rezepten und Ideen – hier findest du garantiert bei jedem Besuch kulinarische Inspirationen.
| Prep
| 0:10
|
| Cook
| 1:40
|
| Yields
| 12 servings |
### Ingredients
-
130 g unsalted butter
-
350 g ripe bananas
-
100 g caster sugar
-
2 eggs
-
220 g plain flour
-
2 tsp baking powder
-
1 pinch salt
-
1 tsp bicarbonate of soda
-
100 g buttermilk
-
2 tsp natural vanilla extract
-
Melt butter with sugar.
-
Mix everything.
-
Bake in 180 C for about 50 minutes
| Prep
| 0:40
|
| Cook
| 1:00
|
| Yields
| 12 servings |
### Ingredients
For the cake:
-
250 g (light brown) sugar
-
250 g butter
-
5 eggs
-
1 orange, zest and juice
-
150 g (optionally whole-grain) flour
-
1 tsp baking powder
-
125 g ground almonds
-
125 g shelled wallnuts
-
1 tsp ground cinnamon
-
0.5 tsp ground cloves, Nekeln
-
0.5 tsp nutmeg, Muskatnuss
-
0.5 tsp ground ginger
-
5 Carrots, approx. 250 g
-
pinch of salt
-
150 g mascarpone cheese
-
225 g full-fat cream cheese
-
85 g icing sugar
-
1 lime, zest and juice
-
10 g shelled wallnuts
1.
Preheat oven to 180 °C.
2.
Grate the carrots.
3.
Beat the butter and sugar together until pale and fluffy.
4.
Separate egg whites and yolks. Put egg yolks to the butter mix and whites in a separate bowl.
5.
Add the orange juice and zest to the cake mix, mix well.
6.
Add flour, and baking powder. Then add the ground almonds, walnuts, spices and grated carrot and mix well together well.
7.
Whisk the egg whites and salt until stiff.
8.
Gently fold the stiff egg whites into the cake mix.
9.
Grease and line a 22cm cake tin.
10.
Scoop the mix into a prepared cake tin and cook in a preheated oven for around 45-50 mins until golden and risen.
11.
Do the toothpick test.
12.
Leave the cake to cool in the tin for at least 10mins, then take it out and let it cool for another hour before icing.
13.
Mix all the icing ingredients together.
14.
Spread generously on top of the cake.
15.
Store in a fridge.
Improve this recipe with [https://www.youtube.com/watch?v=lhnzdRD-hX8](https://www.youtube.com/watch?v=lhnzdRD-hX8 "https://www.youtube.com/watch?v=lhnzdRD-hX8")
[](https://krivis2.zygi.xyz/_detail/recipe/chocolate_brownie.jpg?id=recipe%3Achocolate_brownie "recipe:chocolate_brownie.jpg")
### Ingredients
-
300 g black chocolate
-
100 g milk chocolate
-
200 g butter
-
220 g flour
-
175 g sugar
-
1 pinch salt
-
2 tbsp cacao
-
2 tsp dissolvable coffee, dissolved in a bit of water
-
2 eggs
-
0.5 tsp vanilla sugar
-
100 g almonds
1.
Melt the chocolate with butter.
2.
In a bowl mix eggs, sugar, coffee.
3.
Let the chocolate cool down and mix it with the eggs mix.
4.
In a separate bowl, mix flour with cacao, salt. Add the chocolate-eggs mass.
5.
Add chopped milk chocolate and almonds to the mix.
6.
Bake it for 30 mins in 175C.
| Prep
| ⏱️ 0:20
|
| Cook
| ⏱️ 0:40
|
| Yields
| 🍴 6 servings |
### Ingredients
-
6 egg yolks
- 500 ml cream (35% fat)
- 50 g sugar
- 1
vanilla bean, split lengthwise (or 1 teaspoon vanilla extract)
-
6 tablespoons of brown sugar (for caramelization)
-
Heat the oven to 160 C.
- On a baking dish, place 6 ramekins side by side.
- Set the kettle to boil the water. Once boiling, fill the baking dish with water until to almost submerge the ramekins.
- Add the cream to a saucepan. S
crape the seeds from a vanilla bean into the cream. **Bring the cream with vanilla seds to almost simmering**, then remove from heat.
-
While the mixture is heating, **whisk the egg yolks with sugar** in a separate bowl.
-
When the cream reaches the desired temperature, **slowly pour the cream** into the eggs while continuously whisking the eggs.
-
**Strain the mixture** through the strainer into a clean bowl.
-
**Fill the ramekins** with the mixture.
-
**Bake for 25-35 minutes**. Or until the custard is still slightly jiggly but the centers are barely set. The center of the custard should reach 70 C.
-
**Cool the ramekins** in the fridge for at least **4 hours**.
-
Remove the ramekins from the fridge, add a spoon of sugar to each of them. Use the torch to **caremelize the sugar**.
-
Enjoy!
| Prep | 0:20 |
| Cook | 0:30 |
| Yields | 16 servings |
-
2 Eier
-
60 g Mascobado Zucker
-
1 TL Vanille Extrakt
-
240 g Haferflocken
-
60 g Kokosraspeln
-
140 g Butter, geschmolzen
-
40 g Mehl
-
140 g Vollmilchkuvertüre
1.
Den Ofen auf 180°C (350°F) vorheizen. Ein Backblech mit Backpapier auslegen und zur Seite stellen.
2.
In einer großen Schüssel den Zucker mit den Eiern und Vanille Extrakt auf höchster Stufe schaumig aufschlagen - dauert etwa 5-6 Minuten.
3.
In einer zweiten Schüssel die Haferflocken mit den Kokosraspeln und der geschmolzenen Butter vermischen und dann zur Ei-Zucker-Mischung zugeben und unterrühren. Das Mehl darüber geben und mit einarbeiten - der Teig wird recht klebrig sein.
4.
Teig etwa 5 Minuten ziehen lassen und dann mit einem Eßlöffel oder Cookie Scoop gleichgroße Portionen mit etwas abstand auf das Backblech setzen und etwas plattdrücken (geht mit feuchten Fingern am Besten). Für etwa 15 Minuten backen, dann herausnehmen und auf einem Kuchengitter abkühlen lassen.
5.
Die Kuvertüre über einem Topf mit köchelndem Wasser schmelzen und wieder etwas abkühlen lassen. Die Cookies mit der Unterseite in die Schokolade tunken oder bepinseln und dann trocknen lassen.
-
500 g flour
-
250 ml milk
-
7 g dry yeast, 7 g = one pack
-
20 g (alternatively) fresh yeast
-
100 g sugar
-
1 pinch of salt
-
2 tbsp oil
-
50 g poppy seeds
- 0.5 glass of poppy seeds
-
1 l of water
-
3 tbsp of honey
1.
Heat the milk to roughly 38 degrees C. Add dry yeast, salt, sugar, and oil. Mix well
2.
Add half of the flour, mix well, cover the bowl with the mixture with a towel and let it rest for half an hour.
3.
Add the rest of the flower and poppy seeds. Knead the dough for at least 5 minutes. The cover with the towel again and let it rest for at least an hour until it doubles in size.
4.
Compress back the dough, cut into smaller pieces, roll these pieces to a tiny tube (1 cm in diameter). Cut it in tiny pieces.
5.
Bake in an oven 190C for 20 mins or until golden brown.
6.
Once baked, let it rest before serving.
7.
Submerge the poppy seeds with a boiling water and let it rest for at least a couple of hours.
8.
Blend this mix for 5 minutes minutes in a blender.
9.
Then add lukewarm water and honey and blend this mix for a couple of minutes more.
| Prep | 1:00 |
| Cook | 1:10 |
| Yields | 60 units |
-
250 g Butter, weich
-
250 g Zucker
-
0.5 Päckli Vanillezucker
-
1 Zitrone, abgeriebene Schale
-
2 Eier
-
500 g Mehl
-
2 Eigelb zum Bestreichen
1.
Butter rühren, bis sich Spitzchen bilden. Zucker, Vanillezucker und Zitronenschale dazurühren. Eier zugeben, rühren, bis die Masse hell ist. Mehl dazusieben, zu einem Teig zusammenfügen, in Folie gepackt ca. 1 Stunde kühl stellen.
2.
Teig portionenweise auf wenig Mehl 6-8 mm dick auswallen. Aus dem Teig verschiedene Formen ausstechen. Auf ein mit Backpapier belegtes Blech legen. Mit Eigelb bestreichen, an der Kälte leicht antrocknen lassen, Vorgang wiederholen.
3.
In der Mitte des auf 200°C Ober-/Unterhitze (180°C Heissluft/Umluft) vorgeheizten Ofens ca. 10 Minuten backen.
-
3 eggs
-
100 g sugar
-
5 g baking soda
-
400 g flour (or 200g for the FooDee method)
-
80 g honey, 1 tbsp = 20g
-
100 g butter
-
1 pinch of salt
-
500 g sour cream
-
120 g condensed milk
-
0.5 lemon juice, or lime
- 100 g butter
- 100 g sugar
- 375 g milk
- 20 g starch
- 1 egg
- 1 tsp vanilla extract
### Instructions
1. Melt the butter, honey, and sugar on low heat until everything is melted and smooth. Mix constantly.
2. Add soda, and continue cooking on low heat while mixing constantly. Cook until the mixture reaches a desired color. Then remove from the heat.
3. Add flour, salt, and eggs. Mix until combined.
**Spread-method (FooDee)**
1. Prepare two baking sheest with a parchment paper.
2. Spread the dough onto it evenly.
3. Place it into the preheated oven (180 C) for 6-12 minutes or until the layer is fully baked (dry).
4. Place layers on top of each other. Using the pizza knife cut the edges. Leave them for the crumbles to decorate the cake.
5. Divide the layer into four even parts.
**Roll-method (Boris)**
1. Divide the dough in 8 equal parts. If you roll it into a stick, it will help you to measure more easily for an equal parts. Wrap it in a plastic wrap and let it rest in the freezer for 10-15 minutes.
2. Roll the dough pieces until it's slightly bigger than the round form (~21 cm) that you will be using for cutting the shape out of dough. Use that form and cut around following the shape. Collect the leftovers.
3. Fill the oven tray with rolled dough as soon as you roll them and shove into the preheated oven of 180 °C and let it stay there for 7-10 minutes until it browns. Once baked put it out of the oven. Repeat steps 4, 5 until all dough pieces are baked. Then bake the leftovers.
1. Mix the filling ingredients well. Place one baked layer on a plate then spread a generous amount of filling on top, add another layer on top and repeat until all layers are in the cake. Some of the filling should be still left.
2. Crush baked leftovers into breadcrumbs. If the rest of the filling is too liquid, add some breadcrumbs inside until it becomes creamy.
3. Spread this icing on top and on the side of the cake.
4. Generously cover the top and the sides of the cake with breadcrumbs.
5. Let the cake rest in the refrigerator for at least 4 hours (or better overnight).
1. Melt the butter in the pot on low heat.
2. Add all ingredients. While mixing constantly bring it to simmer. Then put it on low heat.
3. While continuously mixing, heat the custard until gel-like consistency.
4. Remove from heat, cover, and place it aside.
# Pistachio cardamom cake
From: [receptumedis.lt](http://www.receptumedis.lt/dienos-valgiai/desertai/pyragai/pistaciju-ir-kardamono-pyragas/ "http://www.receptumedis.lt/dienos-valgiai/desertai/pyragai/pistaciju-ir-kardamono-pyragas/")

| Prep | 0:20 |
| Cook | 0:45 |
| Yields | 4 servings |
-
50 g peeled pistachios
-
150 g flour
-
0.75 tsp ground cardamom or 2 tsp whole cardamom seeds.
-
115 g butter
-
200 g sugar
-
3 eggs
-
1 tsp baking powder
-
1 pinch of salt
-
30 g butter
-
1 tsp sugar
-
60 g almond flakes
1.
Heat the oven to 175 degrees.
2.
Melt 30 g of butter and pour it to a baking form.
3.
Spread 1 tsp of sugar to cover the whole bottom of the form.
4.
Spread almond flakes evenly across the bottom.
5.
Grind pistachios with 35 g flour and cardamom with a grinder or blender.
6.
In a separate bowl mix butter and sugar (3 min).
7.
Add eggs and mix evenly.
8.
In a separate bowl mix flour, pistachio mix, baking powder, and salt.
9.
Add flour mix to butter mix and mix briefly and carefully.
10.
Add dough to the baking form.
11.
Bake for 40-45 min.
12.
Let it rest for 15 min.
-
200 g flour
-
200 g sugar
-
200 g melted butter
-
200 g eggs, 1 egg is ~50g
-
1 tsp baking powder
-
1 tsp vanilla sugar
-
-
400 g apples deskinned and cut in slices, 1 apple is ~130g
-
1 Brown sugar
-
1 Apricot marmalade
1.
Mix cake ingredients together.
2.
Deskin apples and cut them in slices.
3.
Add apples to the baking form (~26cm).
4.
Start from the edges, go round and finish in the middle.
5.
Sprinkle some brown sugar on top.
6.
Pour in the cake mix.
7.
Bake in a preheated to 180C oven for 30-35mins.
8.
Remove the cake and smear some apricot marmalade on top of the apples.
| Prep | 1:30 |
| Cook | 1:25 |
| Yields | 35 units |
-
1 Teighölzer
-
1 Ausstechförmchen
-
1 Backpapier für die Bleche und zum Auswallen
-
250 g Butter, weich
-
125 g Puderzucker, gesiebt
-
2 TL Vanillezucker
-
1 Prise Salz
-
1 Eiweiss, leicht verquirlt
-
350 g Mehl
-
200 g Gelee, z.B. Himbeere oder Johannisbeere, oder Aprikosenkonfitüre ohne Fruchtstücke
-
1 Puderzucker zum Bestäuben
1.
Teig: Butter mit dem Handmixer rühren, bis sich Spitzchen bilden. Puderzucker, Vanillezucker, Salz und Eiweiss dazugeben, rühren, bis die Masse hell ist (ca. 4 Minuten). Mehl dazusieben, kurz verrühren, zu einem Teig zusammenfügen. Leicht flach drücken, in Folie gewickelt 1 Stunde kühl stellen.
2.
Teig portionenweise auf wenig Mehl zwischen 2 Backpapieren 3 mm dick auswallen. Gleich viele Spitzbuben-Böden wie -Deckel ausstechen, auf die vorbereiteten Bleche legen, nochmals 15 Minuten kühl stellen. Ofen auf 200°C vorheizen (Heissluft/Umluft 180°C).
3.
In der Mitte des vorgeheizten Ofens 6-8 Minuten backen.
4.
Gelee oder Konfitüre auf den gewendeten Bödeli verteilen, Deckeli aufsetzen, mit wenig Puderzucker bestäuben, trocknen lassen.
-
300 ml milk (cow, almond, oat, or a mix)
-
1/2 banana
-
2 handfuls of frozen strawberries (or raspberries)
-
1 heaped tbsp sugar
1.
Add everything to blender and blend well.
2.
When not smooth enough, add some milk and repeat.
From: [oetker](https://www.oetker.ch/de_CH/rezepte/r/suesse-hefemaeuse)
| Prep time | 0:30 |
| Total time | 2:15 |
-
150 g milk
-
75 g butter
-
450 g flour
-
7 g (1 pack) dry yeast
-
75 g sugar
-
8 g (1 pack) vanille sugar
-
0.5 tsp salt
- 1 egg
- 1 egg white
-
1 egg yolk
- 1 tbsp milk
- 20 razins
1. Heat butter and milk on low heat. Heat until the butter is melted.
2. In a separate bowl flour and yeast.
3. Add the rest of dough ingredients.
4. Mix with a dough mixer. At first slowly, the faster.
5. Take out of the bowl and knead the dough by hand.
6. Put the kneaded dough back into the bowl, cover it, and let it raise for **60 minutes**.
7. Divide the dough into 11 equal pieces.
8. Form 10 drops, place drops onto the baking sheet. Divide the last piece into 10 more pieces. Then form little tails out of them and glue to the bottom of the drops.
9. Let the mice rise for another **30 minutes**.
10. Preheat the oven to 200 C (from top and bottom).
11. Mix egg yolk with the milk. Then brush the mixture on top of the mice.
12. Use raisins to form the mice eyes. Make sure to press it in deeply.
13. Shove it to the oven for **15 minutes**.
14. Then take it out and let it cool on the counter before eating.
# Tiramisu
From [https://www.recipesfromitaly.com/tiramisu-original-italian-recipe/](https://www.recipesfromitaly.com/tiramisu-original-italian-recipe/)
[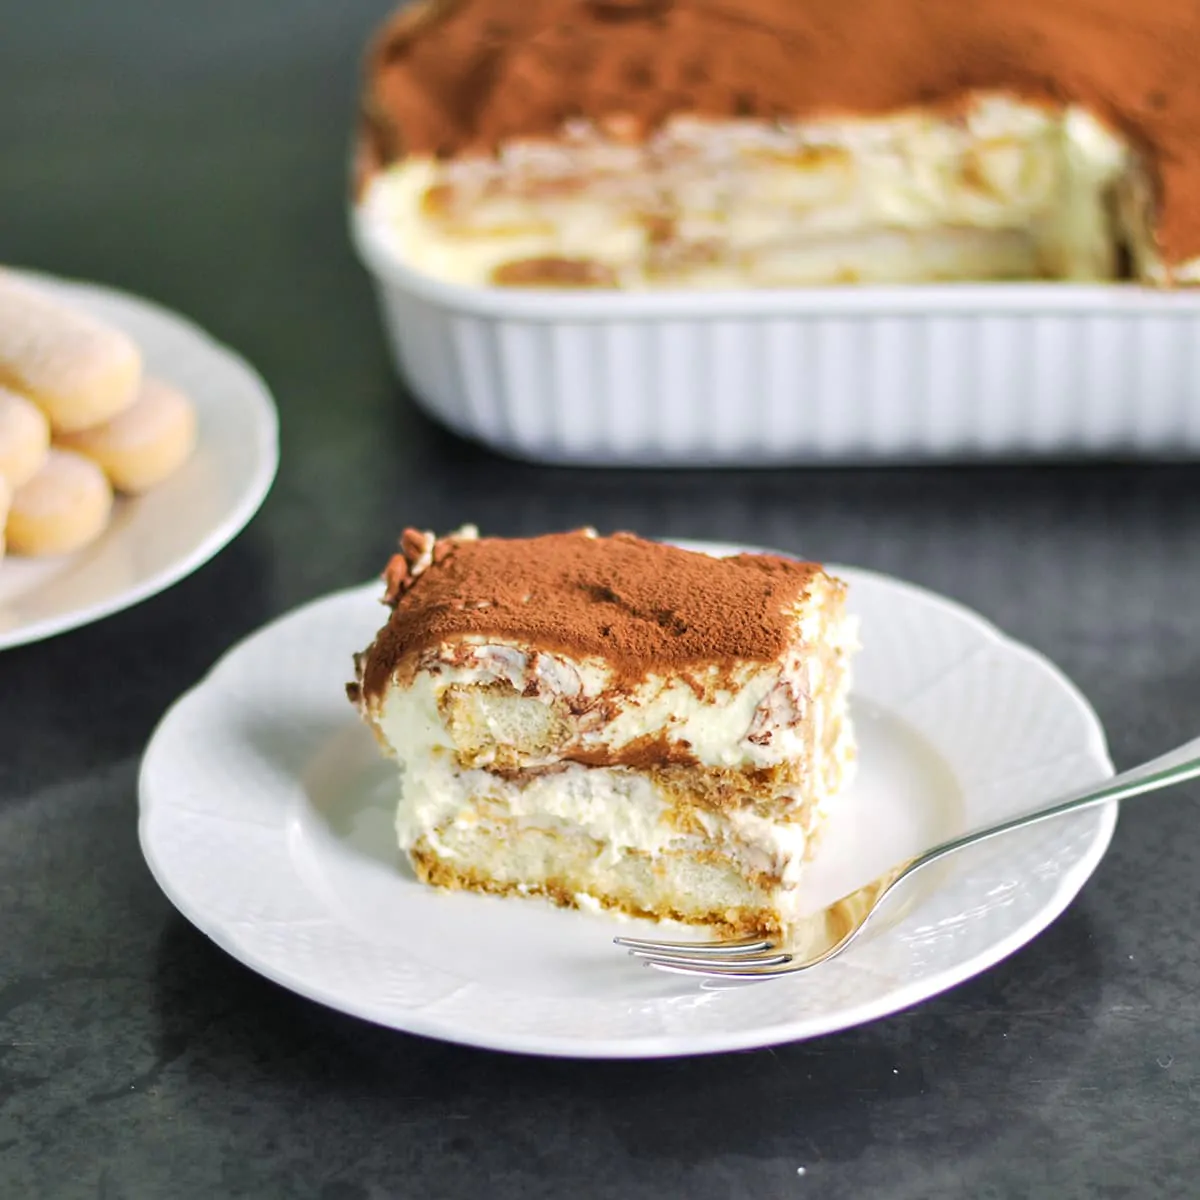](https://krivis.zygi.xyz/uploads/images/gallery/2024-11/image.png)
| Yield
| 8
|
| Time
| 30 min prep + 3 h cooling
|
#### Ingredients
- 300 g (~10 oz) of Savoiardi (Ladyfingers) - about 30 cookies. We recommend [BALOCCO Savoiardi Ladyfingers](https://amzn.to/3TmPQKu), or make [homemade ladyfingers](https://www.recipesfromitaly.com/homemade-ladyfingers-recipe/) with our recipe, which are great!
- 500 g (1.1 pound) of [mascarpone cheese](https://amzn.to/3bKkvu8). Try our recipe for [homemade mascarpone cheese](https://www.recipesfromitaly.com/homemade-mascarpone-cheese-recipe/)
- 4 medium eggs (~220 g or 7.7 oz, without shells)
- 100 g (½ cup) of granulated sugar
- 300 ml (1 ¼ cup) of espresso coffee
- 2 tablespoons of Marsala Wine
- unsweetened cocoa powder for decoration
#### Method

**Step 1)** - First of all, make the coffee. For a quick and delicious Italian coffee, we used an [Espresso Machine](https://amzn.to/379jknF). Then add 2 tablespoons of Rum or Marsala wine. This is optional. If you don't like liqueurs or you are making Tiramisu for children, don't use it. Your tiramisu is great all the same, even without liqueur. Set aside and let cool.

**Step 2)** - Separate the egg whites from the yolks. Set aside the yolks and whip the egg whites until stiff: you will get at it when the the egg whites will not move if you turn the bowl over. Remember that to whip egg whites to stiff peaks, there should be no trace of yolk. Once ready, set aside.

**Step 3)** - Now, in a bowl, beat the egg yolks with sugar until light and smooth, 3 to 5 minutes.

**Step 4)** - In the meantime, pour the mascarpone cheese into a bowl and work it with a spoon to make it softer. Mascarpone cheese must be of excellent quality, creamy and thick. When the yolks are ready add the mascarpone cheese.

**Step 5)** - Using the flexible-edge k-beater, slowly whip the mascarpone cream for 2 to 3 minutes. Now add the stiffly beaten egg whites.

**Step 6)** - Mix with a wooden spoon, from bottom up. Mix slowly until smooth and creamy.

**Step 7)** - Now let's prepare the layers of ladyfingers and mascarpone cream. You can make 2 or more layers, depending on the width and depth of your pan.
Dip the ladyfingers quickly (1 or 2 seconds) into the coffee. Then arrange the ladyfingers in the casserole of your liking.
IMPORTANT: The ladyfingers should not soak too much coffee, otherwise the tiramisu will be too rich in coffee and runny.
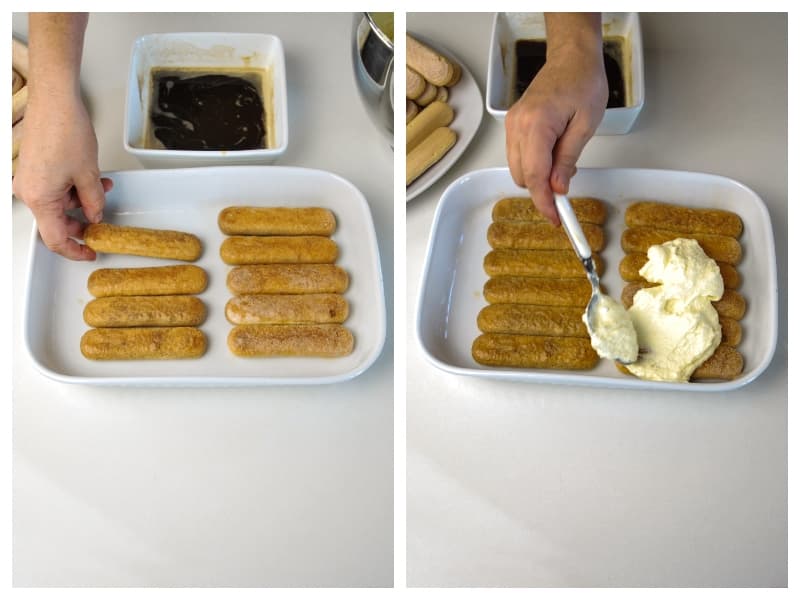
**Step 8)** - Arrange them so that they cover the bottom of the casserole. Then spread the mascarpone cream over the ladyfingers.

**Step 9)** - Add another layer of ladyfingers and then top with more mascarpone cream. If you are making the last layer, spread the mascarpone cream generously.

**Step 10)** - Finally, sprinkle with cocoa powder. You can even add dark chocolate chips, if you like. Allow to rest 3 hours in the refrigerator before serving. Even better if you prepare the tiramisu the day before, letting it rest overnight.

# Grittibänz
[](https://krivis.zygi.xyz/uploads/images/gallery/2024-12/img-8946.jpeg)
Ergibt: 4 Stück
### Zutaten
- 500 g Mehl
- 1.5 TL Salz
- 3 EL Zucker
- 0.5 Würfel Hefe (ca. 20 g), 7 g Trockenhefe
- 60 g Butter
- 3 dl Milch
- 1 Ei
- Rosinen und Mandelatifte zum Verzieren
### Methode
1. Mehl, Salz und Zucker in einer Schüssel mischen. Hefe daruntermischen.
2. Butter und Milch beigeben, mischen, ca. 10 Min. zu einem weichen glatten Teig kneten. Zugedeckt bei Raumtemperatur ca. 2 Std. aufs Doppelte aufgeben lassen.
3. Ofen auf 180 Grad vorheizen.
4. Teig in 4 Proben teilen, zu je eine Rolle formen, ca. 1/5 für Haare und Verzierungen mit wenig Wasser ankleben. Grittibänzen auf ein mit Backpapiet belegtes Blech legen.
Ei verklopfen, Grittibänz damit bestreichen, mit Rosinen und Mandelstiften verzieren, diese gut in den Teig drücken.
5. Backen ca 25 Min. in der unteren Hälfte des Ofens. Herausnehmen, auf einem Gitter auskühlen.
# Dips & Sauces
# Baba Ganoush
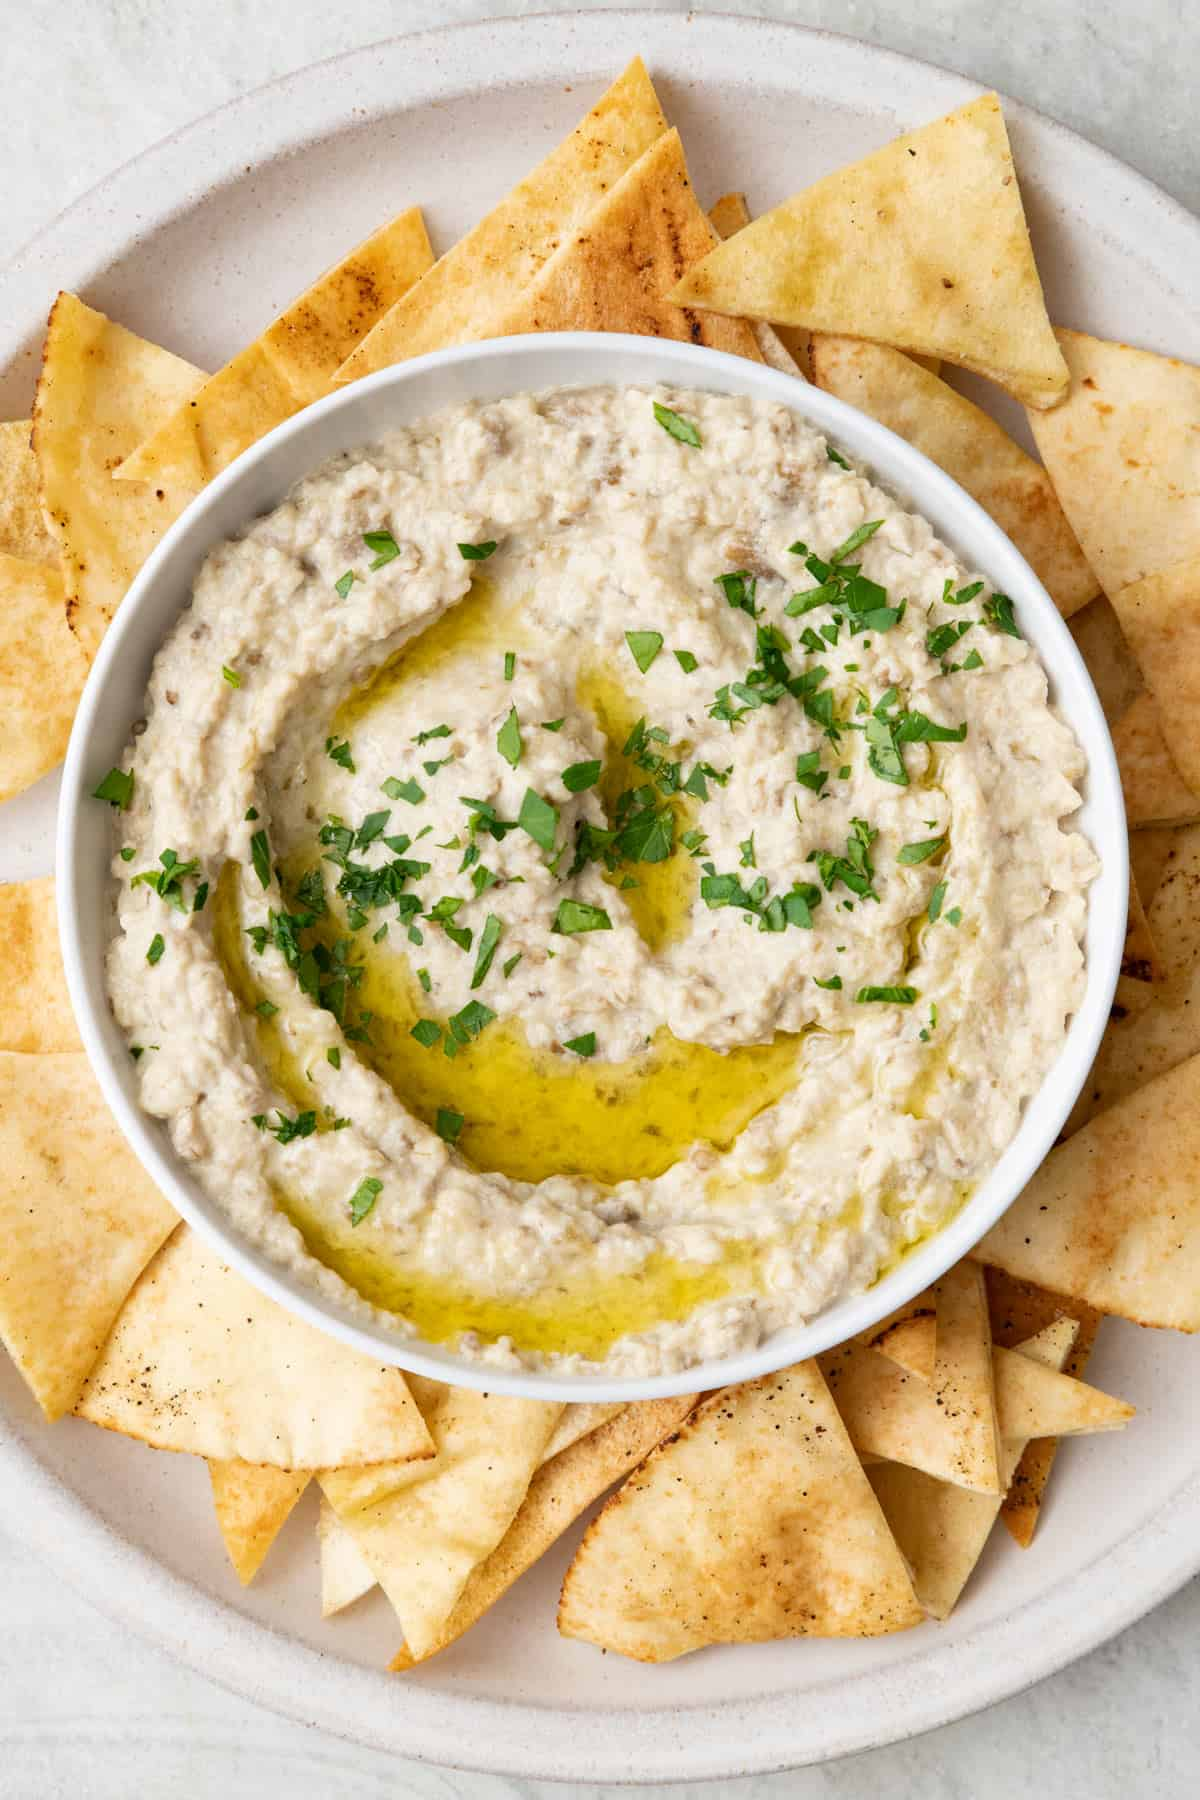
### Ingredients
-
4 (around 1.1 kg) medium eggplants
-
1 big clove of garlic
-
4 tbsp Lemon juice
-
1/2 tsp cumin
-
1 1/2 tsp salt
-
30 g Tahini (can be replaced with peanut butter)
-
40 ml Olive oil
1.
Place whole eggplants in 250 °C grill for 60+ minutes. Or cut the eggplant in half, moisture the inside with oil, and shove it to the preheated 200-220 °C oven. Place the tray 1/3th from the top of the oven.
2.
Once tender, let the eggplants to cool a bit. Then scoop the inside of it, put in the colander and let it rest for 10 mins. Then press with a fork to get rid of extra liquid.
3.
Put the eggplant into a food processor. Press the garlic in, add all other ingredients, and bzzzzz!
-
200 g dried chickpeas
-
30 g lemon juice
-
1 clove garlic
-
1 teaspoons salt, more to taste
-
50 g peanut butter, sunflower seeds butter, or tahini
-
50 g olive oil
-
50 g greek yoghurt
-
0.5 teaspoon ground cumin, more to taste
-
1 ground cumin, for serving
-
1 Olive oil, for serving
-
1 Chopped fresh parsley, for serving
1.
In a bowl, cover chickpeas by at least 5 cm of cold water. Quick soaking method: boil for 5 minutes, then let it rest for 1 hour. Slow: soak for 8 hours. Pressure cooker: add 4 times the weight of water, cook for 50 mins on the second ring; skip the cooking step.
2.
In a medium pot, cover soaked chickpeas by at least 4 inches of water. Bring to a boil over high heat. Reduce heat to medium high and let cook at a vigorous simmer with a lid closed until chickpeas are quite soft, 1 to 1 1/2 hours. (Overcooked chickpeas are the secret to creamy hummus, so don’t worry if they start to break down a little.) Drain. Keep the water
3.
Blend everything but chickpeas until a smooth paste. Add a little of water if needed to help blending. Add chickpeas and blend until smooth paste. Sprinkle with cumin, olive oil, and parsley before serving.
-
2 mangoes (~600g raw weight), cut in cubes
-
1 onion, finely chopped
-
2 clove garlic, finely chopped
-
10 g ginger, finely chopped
-
75 ml white wine vinegar
-
100 ml water (or white wine)
-
40 g sugar (more for less ripe mangoes)
-
1 tbsp honey
-
1 lime zest
-
1/2 tsp salt
-
1/2 tsp black pepper
-
1/2 tsp turmeric (Kurkuma, optional)
1.
Fry onion, garlic, and ginger on low heat until onions start caramelizing.
2.
Add water, bring it to boil, simmer for 10 minutes.
3.
Add lemon zest, vinegar, sugar and honey, season.
4.
Simmer for 20 minutes more until chutney simmers.
5.
During this sterilize the jars (e.g., with boiling water)
6.
After chutney thickened, remove the lime zest, transfer the chutney to jars, and seal it.
-
2 egg yolks
-
200 ml oil (e.g., sunflower, rapseed)
-
1 tsp lemon juice
-
1 tbsp white vinegar (e.g., rice, apple, white wine)
-
0.5 tsp granulated sugar
-
1 heaped tsp dijon mustard
-
0.25 tsp Salt
-
50 g water
1.
Mix water with salt, sugar.
2.
Mix mustard well with vinegar and lemon juice.
3.
To the hand blender cup add egg yolks, then the mustard mix, then oil, finally the water mix.
4.
Submerge the hand mixer into the liquid such that it would completely cover the egg yolks. Press to the ground and hols firmly.
5.
Start mixing. You should start seeing mayonnaise emulsion coming out of the hand mixer holes.
6.
Then lift the mixer slightly up. If you see oil settling to the bottom, start rocking the mixer slightly to the bottom and up.
7.
Continue with such a movement until the top.
8.
Once you reach the top, mix the whole emulsion well from the very bottom to the top, such that all the ingredients mix well.
-
20 g Hazelnuts
-
40 g pecorino (substitute with cream cheese)
-
20 g Parsley
-
1 garlic clove
-
30 g olive oil?
-
30 ml water?
-
1 Salt
-
1 Pepper
1.
Mix everything well in the blender or food processor.
-
150 g almonds
-
1 l water
-
0.25 tsp salt
-
1 tbsp (optionally) date or maple syrup
1.
Soak almonds in water for at least 4 hours. Just fill the water until it covers all almonds.
2.
Drain the water. Add all ingredients to blender. Blend for 1-2 minutes.
3.
Strain almonds through a cloth. Squeeze all the milk out of the pulps.
*Tip*: You can use the almond pulps for granola.
# Kombucha
### First Brew
#### Ingredients
- 2l water
- 100g sugar
- 200ml kombucha starter with scoby
- 1 Tbsp black tea
### Log
- For the 2nd brew I added 25g sugar, 25g honey, 2g ground cumin
# Oat Milk
[](https://krivis2.zygi.xyz/_detail/recipe/oat_milk.jpg?id=recipe%3Aoat_milk "recipe:oat_milk.jpg")
### Ingredients
- 150 g oats
-
1 l water
-
0.25 tsp salt
-
1 tbsp maple syrup
1.
Soak the oats for at least 4 hours. Fill the water with 1.5x the volume of oats.
2.
Drain the oats and rinse them.
3.
Add all ingredients to the blender and blend for 1-2 minutes.
4.
Strain the oats through the cloth and then squeeze the rest of the milk from the pulp.
5.
Tip! Use the leftover pulps for granola. Or freeze it.
| Prep
| 0:30
|
| Cook
| 0:30
|
| Yields
| 4 servings |
### Ingredients
-
400 g beef fillet or rump, in 2-4 cm thin stripes
-
400 g button mushrooms, sliced
-
1 onion, finely chopped
-
1 garlic clove
-
150 g sour cream
-
400 g of beef stock
-
1 tbsp flour
-
1 tbsp mustard
-
50 g of butter
- 2 tbsp Worcestershire sauce
-
pinch of salt
-
pinch of pepper
-
1 bay leaf
-
1 tbsp of chopped dill, green onions, chives, or parsley, for garnishing
1.
Dry the beef stripes and mix them with flour.
2.
Fry mushrooms in a separate pan.
3.
In a frying pan heat the oil. Fry the beef stripes in batches on high heat. Fry each side for around 30 seconds. Then remove the beef from the pan leaving the fat in the pan.
4.
Heat butter in a pan, lower the heat to medium, then onions and garlic. Fry until onions are caramelized.
5.
Add back the beef. Then add white wine and beef stock (or water), sour cream, (optionally) mustard, and bay leaves. Add salt and pepper. Bring it to boil. Let it simmer for 15-20 minutes.
6.
Serve with potatoes and sprinkle the Beef Stroganov with greens.
-
500 g flour
-
1 tsp salt
-
50 ml oil (flavourless)
-
150 ml boiling water
1.
Mix flour with oil and salt
2.
Keep mixing, while mixing slowly pour in the boiling water.
3.
Knead the dough until uniform.
4.
Cover it and let it rest (for 30 min).
-
400-450 g flour
-
1 tsp salt
-
1/2 tsp sugar
-
50 ml oil (flavourless)
-
200 ml water
1.
Mix all ingredients.
2.
Knead the dough until uniform.
3.
Cover it and let it rest.
-
400-500 g flour
-
1/2 tsp salt
-
1 egg
-
250 ml kefir
1.
Mix all ingredients but flour.
2.
Add flour. Knead until uniform.
3.
Cover it and let rest.
-
300-350 g of desired meat (minced or better chopped, try pork blade shoulder/neck)
-
2-3 medium onions
-
salt
-
black pepper
-
50-80 ml water
-
greens (any, dill, parsley, coriander, etc)
1.
Chop ingredients.
2.
Mix together.
-
400 g cheese.
-
salt
-
(optionally) greens.
1.
Grate the cheese.
2.
Mix ingredients.
1.
Divide the dough into small balls size of an egg.
2.
Roll out the dough on a layer of flour into a shape of a circle until the dough is 3 mm thick.
3.
Add the filling on top. It should cover half of the circle, leave 2 cm from the edge uncovered.
4.
Fold the other half of the dough on top.
5.
Gently squeeze the trapped air out.
6.
Use the fork to press on the edges such that they would glue together.
7.
Heat the pan with enough oil such that the chebureks could float in it.
8.
Add chebureks to the pan (should fit 2 of them at a time).
9.
Fry for 3-5 minutes, flip over, the fry for 3-5 minutes more.
10.
Remove the chebureks and place them on a kitchen towel.
-
4 deboned chicken thighs, 1 boned thigh = 200 g
-
1 capsicums
-
4 tbsp unflavored yoghurt
-
1 tsp paprika
-
1 tsp oregano
-
0.5 tsp black pepper
-
0.5 tsp MSG
-
1 tsp Salt
-
1 tsp (optionally) thyme
-
4 wraps
-
1 tbsp white sauce, optionally
-
2 pickled cucumber, sliced
-
2 tomatoes, sliced
-
4 tbsp unflavored yoghurt
-
2 tbsp mayonnaise
-
2 clove pressed garlic
-
2 tbsp dill
-
1 tsp salt
1.
Mix chicken and spices mix in a baking dish.
2.
Roast at 220 C for about 30 min.
3.
While it's roasting, mix the white sauce, prepare other wrap ingredients.
4.
Take out the chicken. Store any chicken stock for later. Slice the chicken thinly, spread it on a baking sheet. Add sliced capsicums, shove it in the oven to roast for around another 10 minutes until browned.
5.
Spread the white sauce onto a wrap, compose all ingredients, and wrap it.
| Prep | 0:10 |
| Cook | 0:15 |
| Yields | 2 servings |
-
500 g chicken breast, diced in 1×1 cm cubes
-
1.5 cups thick coconut milk
-
2 cups thin coconut milk, 1 cup thick coconut milk with 1 cup water
-
0.25 cup peanuts, roasted
-
200 g small potatoes, peeled and cut into bite-sized pieces
-
200 g pineapple, peeled and cut into bite-sized pieces
-
4 cardamom leaves
-
4 cardamom seeds
-
3 tbsp tamarind paste
-
1 tbsp seville orange juice
-
3 tbsp fish sauce
-
3 tbsp palm sugar
-
120 g massaman curry paste
-
7 large dried chilies, seeded, coarsely chopped and roasted
-
1 tsp salt
-
3 tbsp shallots, finely chopped
-
3 tbsp garlic, finely chopped
-
1 tsp galangal, finely chopped
-
1 tbsp lemongrass, finely chopped
-
1 tsp coriander roots, finely chopped
-
1 tbsp coriander seeds, roasted
-
0.5 inch cinnamon, roasted
-
0.5 tsp cumin seeds, roasted
-
1 tsp peppercorns, roasted
-
0.5 tsp nutmeg seeds, roasted
-
1 nutmeg flower, roasted
-
3 cloves, roasted
-
3 cardamom seeds, roasted
-
1 tsp shrimp paste
1.
If making curry paste on your own, finely pound all ingredients together.
2.
Add the thin coconut milk into a pot and heat over medium heat. Add the chicken and simmer until tender. Remove the chicken from the pot and set aside the thin coconut milk.
3.
Heat the thick coconut milk in a pan over medium heat and stir frequently. As the coconut milk separate into layers, add the curry paste and stir-fry until fragrant. Add the chicken and fish sauce, stir through.
4.
Heat the thin coconut milk pot over medium heat. Once boils, add the chicken. As the curry sauce boils again, add sugar, tamarind paste, orange juice, and peanuts. Stir well.
5.
Add the potatoes, pineapples, cardamom seeds and leaves and stir through. Simmer for another 5-10 minutes. Adjust the flavor and remove from the stove.
-
800 g potatoes
-
400-500 g chicken (ideally, boneless chicken thighs)
-
100 g fresh bread
-
100 g onions, not cut
-
100 g onions, cut in half-rings
-
50 g milk
-
300 g button mushrooms (champignons)
-
some fresh prasley
-
200 g cucumber
-
100 g cream
-
1/2 tsp nutmeg (Muskatnuss)
-
salt, pepper, and sugar
-
1/2 tbsp flower
-
250 ml of chicken broth
1.
Peel potatoes, cut big potatoes into smaller pieces, set them to boil
2.
Add chicken, uncut onion, bread, salt, and pepper to the food processor and process it until it mixes somewhat.
3.
Add milk, continue blending. Reach the consistency of meat cut in small pieces.
4.
Cut cucumber into thin slices, add it to bowl. Add cream, some salt, some sugar, parsley. Mix.
5.
Form meatballs from of the processed meat, set it aside.
6.
Heat some oil in a pan, add meatballs and fry on high heat 2-3 minutes until browned. Don't forget to turn them.
7.
Remove meatballs from the pan. Reduce the heat, add onions and mushrooms. Fry until onion caramelizes.
8.
Add flower, salt, and pepper. Mix. Then add the broth. Bring it to boil.
9.
Add meatballs to the pan, and then reduce the sauce with meatballs inside it. Should take 5-8 minutes.
10.
Assemble potatoes, meatballs with sauce, and cucumber salad on a plate.
-
2 medium onions
-
2 cloves garlic
-
2 medium carrots
-
2 sticks celery
-
2 red peppers
-
olive oil
-
2 habanero peppers
-
1 heaped teaspoon ground cumin
-
1 heaped teaspoon ground cinnamon
-
400 g or 1 tin of chickpeas
-
400 g or 1 tin of red kidney beans
-
800 g or 2 tins of chopped tomatoes
-
500 g quality minced beef
-
400 g basmati rice
-
500 g natural yogurt
-
0.5 a bunch of fresh coriander
-
2 tablespoons balsamic vinegar
- 1 lime
1.
Cook rice.
2.
Peel and finely chop the onions, garlic, carrots, and celery – don’t worry about the technique, just chop away until fine. Halve the red peppers, remove the stalks and seeds and roughly chop. Remove seeds from habanero peppers and chop them.
3.
Heat 2 tablespoons of oil in a large casserole pan on a medium-high heat, add the chopped veg, habanero peppers, cumin, cinnamon and a good pinch of sea salt and black pepper, then cook for 7 minutes, or until softened, stirring regularly.
4.
Drain and add the chickpeas and kidney beans, tip in the tomatoes, breaking them up with the back of a spoon, then pour in 1 tin's worth of water. Add the minced beef, breaking any larger chunks.
5.
Pick the coriander leaves and put aside, then finely chop and add the stalks to the pan, with the balsamic vinegar. Season with a good pinch of sea salt and black pepper.
6.
Bring to the boil, then reduce the heat to low and simmer with a lid slightly ajar for 1 hour, or until slightly thickened and reduced, stirServe up with fluffy rice or couscous, a hunk of crusty bread, or over a jacket potato, with some yoghurt, guacamole, and wedges of lime on the side for squeezing over. Sprinkle over the reserved coriander, and some fresh chili, if you like, then tuck in.
| Prep | 1:30 |
| Cook | 0:30 |
| Yields | 12 servings |
-
6 medium onions, cut in half-rings
-
0.5 kg beef or lamb, in small 2-3 cm slices
-
1 kg potatoes, peeled and halved if too big
-
1 kg tomatoes, cut in slices
-
0.5 kg carrots, cut into straws of 3 cm length
-
0.5 kg capsicum, cut in slices
-
3 whole heads of garlic, washed
-
1 bunch of fresh dill
-
1 bunch of fresh parsley
-
1 bunch of fresh coriander
-
1 bunch of fresh onion
-
1 black pepper
-
1 salt
1.
Roughly cut fresh herbs so they won't be longer than 5cm. Set some onion aside and cut into smaller pieces for garnish.
2.
Heat the pressure cooker and dry-fry meat and onion until a little brown crust appears.
3.
Take the cooker off the heat. Add salt (1/2 teaspoon), black pepper.
4.
Add layers of carrots, then capsicum, then tomatoes. Season with salt after each layer.
5.
Add a layer of fresh herbs (except for fresh onion).
6.
Insert heads of garlic. Finally, add a layer of potatoes. Season with 1/2 teaspoon of salt.
7.
Close the cooker, heat it until the second pressure level and cook for 40min.
8.
Remove the heads of garlic, they won't be needed anymore.
9.
Add potatoes on the side, the “beefy” part in the middle, pour some broth on top, and finally, sprinkle with fresh onion.
-
1 bread Bauernbrot
-
400 g Gruyère, grated
-
400 g Deutschschweizer cheese (Emmentaler, Appenzeller, Fribourger), grated
-
50 ml Kirsch
-
1 clove of garlic
-
1 pinch of salt
-
1 pinch of pepper
-
1 pinch of nutmeg, Muskatnuss
-
15 g starch
-
375 ml white wine
1.
In the fondue pot heat up the white wine to medium heat.
2.
Pour in grated cheeses. Stir continuously.
3.
Mix kirsch with stark in a cup.
4.
Once the cheeses reach a creamy consistency, pour in the mix. Keep stirring.
5.
Add salt, pepper, and nutmeg.
6.
Cut the bread into 3x3cm squares, and serve. Don't forget to lit up a heater under the fondue pot.
-
1 glass of rice, preferably jasmine
-
300 g water
-
400 g chicken fillet, about 2 chicken fillet pieces, cut into 1 cm cubes
-
70 g 1 Chinese leek or 5 spring onions, sliced in 1 cm pieces
-
10 g (8 small or 5 big) dried chili peppers, de-seeded, cut in 1 cm pieces
-
1 clove of garlic, finely chopped
-
5 g (1 slice) ginger, finely chopped
-
1 tsp (2 gr) Sichuan peppercorn
-
50 g roasted peanuts
-
1 tsp sesame oil
-
1 tsp dark soy sauce
-
2 tsp starch
-
1 tbsp vegetable oil
-
0.33 tsp MSG
-
1 tsp starch
-
1 tsp sugar
-
1 tsp Sichuan Pixian bean paste
-
3 tbsp black rice vinegar, Cheng-cu or Chin-kiang vinegar
-
2 tbsp Chinese cooking wine, shaoxin wine
-
2 tsp dark soy sauce
-
2 tsp soy sauce
1.
Cook rice.
2.
Place the chicken into a bowl mix with the marinade. Set aside.
3.
Set aside the garlic the ginger and the leek in a separate bowl.
4.
Set aside the chili and Sichuan peppercorn in a separate bowl.
5.
Combine all sauce ingredients in a separate bowl. Taste and adjust the sourness and sweetness flavor when needed.
6.
Add 1 tablespoon vegetable oil in the wok. When it is smoking hot, add 4 teaspoons of oil and fry the chicken till well cooked.
7.
Transfer to a colander to drain the excess oil and moisture.
8.
Add 3 tablespoons vegetable oil in the wok. On low heat, stir fry the chili peppers and Sichuan peppercorn till fragrant. Transfer the dry spices from the wok into the plate but leave the oil behind.
9.
Add the ginger, garlic, and leek into the wok and stir fry till fragrant. Turn the heat up high and add the chicken. Stir well.
10.
Add the sauce. Fry until it thickens.
11.
Toss in the fried peppers, sesame oil, and peanuts and mix well.
12.
Serve rice and chicken in separate bowls.
| Cook 0:20 | |
| Yields | 2 servings |
-
2 tbsp sake
-
2 tbsp mirin
-
3 tbsp soy sauce
-
1 glass Japanese short grain rice
-
1 onion, cut in half-rings
-
340 g thinly sliced beef, chuck or rib eye
-
1 tbsp neutral flavor oil (vegetable, canola, etc
-
2 tsp sugar
-
0.5 cup dashi, Japanese stock
-
2 green onions/scallions, cut in small slices or rings
-
Pickled red ginger, for garnish
-
2 onsen eggs
-
Japanese chili powder with sesame
1.
Cook the rice.
2.
Put beef to a freezer for an hour. Then take it out and now slice it in thin slices. (You may prepare in such a way in advance and keep thinly cut slices in the freezer for the future).
3.
(Optionally) prepare the onsen egg.
4.
Bring in one pot water for beef to boil, and heat the oil in a large frying pan over medium-high heat.
5.
Boil the beef slightly, until no longer pink.
6.
Fry the onion until tender.
7.
Remove (and drain) the beef from the pot and add to the pan.
8.
Add sugar and fry for 30 seconds.
9.
Add teriyaki sauce and dashi to the pan.
10.
Lower the heat and simmer for 2-3 minutes.
11.
Add rice to the bowl. Then cover it with beef. On a side add pickled ginger onion and onsen egg. Sprinkle the garnish with chili-sesame powder.
-
500 g minced beef, can be replaced with minced turkey
-
500 g minced pork
-
200 g cheese, Appenzeller
-
1 egg
-
2 onions
-
150 g white bread
-
1 tbsp honey mustard
-
0.5 cup milk
-
3 tbsp water
-
1 salt
-
1 tsp ground black pepper
1.
Chop the onions finely and fry till it starts to brown. It does not need to be fully fried.
2.
In a separate bowl submerge white bread into milk.
3.
Whisk the egg with the mustard.
4.
Mix all ingredients by hand. Then form flat balls size half of a (Žygio) palm.
5.
Fry them on medium heat from both sides covered under the lid. You can add some water into the pan to let them steam a little.
-
300 g cake flour, high protein/gluten
-
2 eggs
-
Water, eggs + water = 150 g
-
2 g salt
-
1 tbsp of soy sauce
-
1 tsp of Chinese black vinegar [Zhengjiang black vinegar: [amazon](https://amzn.to/2RUKGnB)]
-
1 tsp of dark soy sauce
-
1 tsp of minced ginger
-
1 tsp of minced garlic
-
2 tsp of chili flakes
-
some spring onions
-
some cilantro
-
2.5 tbsp of vegetable oil
1. Add everything to a bowl, mix with chopsticks. Knead with your hands until smooth. Cut into two blobs. (Optional) Wrap in a plastic wrap. Rest for 15min.
2.
Roll the dough. Sprinkle some dry flour on top. Then fold the dough four times. Cut with a pizza knife as thin as possible. You can use a cutting board to guide you.
3.
Mix all sauce ingredients together. Then mix the sauce with the noodles.
4.
Heat up the oil and poor on top of the sauced noodles. Then mix well.
-
1.5 kg pork ribs
-
1.5 tsp salt
-
1 black pepper
-
1 dried garlic
-
4 tbsp tomato sauce
-
2 tbsp soy sauce
-
1 tsp honey
-
1 tbsp mustard
-
1 tbsp Worcester sauce
1.
Cover ribs in salt, pepper, dried garlic
2.
Put ribs on a grill and shove it to the preheated to 200C oven for 1 hour.
3.
Take the ribs out, cover them in a foil. Put it to the oven for another hour.
4.
Prepare the glaze. Add all sauce ingredients, heat it on the stove just below the boiling point, stir continuously for about 5 minutes.
5.
Take the ribs out, remove the foil, apply the glaze all over, then shove it to the oven for another 15 minutes.
-
4 tbsp tamarind paste
-
2 tbsp fish sauce
-
35 g (best palm, brown second) sugar
 It's possible to replace both the fish sauce and tamarind with 3-4 tablespoons of Worcestershire sauce. Not the same, but pretty good.
Main:
-
2 shallots, chopped AND
-
70 g garlic chives, cut into 5 cm pieces (optional?) OR
-
1 bunch green onions (or better Chinese leek), white parts chopped in pieces for aromatics, green finely chopped for garnish
-
2 garlic cloves, semi-coarsely chopped
-
1 fresh red chili (optional, can be substituted with chili powder)
-
1 chicken breast (150 g), cut across the grain, 1 cm pieces. Shrimp is an excellent alternative.
-
100 g extra firm tofu (optional), cut in cubes
-
2 eggs
-
3 Tbsp finely chopped SWEET preserved daikon radish (optional?)
-
120 g mung bean sprouts
-
100 g Pad Thai noodles (flat rice noodles)
-
4 tbsp (40 g) roasted peanuts, crushed
-
oil
-
some water
-
0.5 lime, cut in 2 wedges. Cut around the core so that wedges would not have core in them.
1.
Mix up the sauce and let the sugar dissolve.
2.
Prepare the ingredients. The frying is very fast (3 minutes) and you need everything ready by that.
3.
Prep the noodles:
1.
**Method 1**: Fill a nonstick pan with water, bring it to boil. Put the noodles in. Cook for 2-3 minutes. Then dump the noodles into the strainer and shock with cold water to prevent them from sticking and cooking further. Set aside.
2.
**Method 2**: soak noodles in warm water. Let it rest there while you prep other ingredients.
4.
⚠️ From now on cook for one ration at a time!
5.
Dry the pan, return to cooking. Add oil, let it heat up.
6.
Put half of the chicken in, stir a bit, spread the chicken thin and let it fry like that to let it brown.
7.
When the chicken pieces are opaque 2/3rds of the way up, put in half of your tofu, shallots/garlic/chili mixture and stir it aggressively. Push it over to one side of the pan (it's OK that the chicken and veg aren't fully cooked yet).
8.
Dump in half the noodles, a third of the sauce (you can always add more sauce if you think it needs it), splash of water, combine. The water liquidifies the sauce and allows the noodles to finish cooking.
9.
Push everything to the side, on the other side add some oil, crack an egg, scramble it, then fold the combined noodles onto the scrambled egg. Let it roast for a handful of seconds, then mix everything.
10.
Add half the bean sprouts, chives or spring onions, a few chopped peanuts, and stir to combine.
11.
Put it on a plate, garnish on the side of the plate with lime wedges, more peanuts, garlic chives. Wipe out the pan and cook the second portion.
-
200 g Champignons, in Scheiben
-
200 g Shiitake-Pilze, in Streifen
-
16 g getrocknete Steinpilze, grob gehackt
-
2 Schalotten, in feinen Streifen
-
2 Knoblauchzehen, in Scheibchen
-
1 Bio-Zitrone, wenig abgeriebene Schale
-
1 EL Thymianblättchen
-
1 dl Weisswein
-
6 dl Wasser
-
2.5 dl Vollrahm
-
350 g Spaghetti (z. B. Voiello), halbiert
-
1.25 TL Salz
-
1 wenig Pfeffer
-
50 g Sbrinz Käse, gerieben
-
Champignons und alle Zutaten bis und mit Pfeffer in eine weite Pfanne geben, mischen.
-
Aufkochen, bei mittlerer Hitze unter gelegentlichem Rühren ca. 20 Min. kochen.
-
Käse darüberstreuen.
-
3 cups cooked white rice
-
100 g cooked chicken breast or pork, cut into small pieces
-
4 prawns
-
1 tbsp garlic, finely chopped
-
0.5 cup pineapple, diced into 14 inch-cubes
-
25 g each green and red bell pepper, sliced into.25 inch-pieces
-
50 g onion, diced into.25 inch-cubes
-
1 tbsp fish sauce
-
1 tsp sugar
-
0.25 tsp ground salt
-
0.5 tsp ground white pepper
-
1 egg, beaten
-
0.25 cup vegetable oil
1.
Peel the prawns, devein and remove the heads. In a saucepan on medium heat stirfry the prawns without any oil until cooked. Set aside.
2.
Heat 1 tbsp oil in a saucepan on medium heat. When the oil is hot, add the beaten egg into the middle of the pan. Tilt the pan around and allow the egg to thinly come the pan. When the egg is cooked, roll and remove from the pan. Allow the omelet to cool before slicing the roll into thin slices.
3.
Heat the remaining oil in a pan over medium heat. Stir-fry the garlic until fragrant then add the chicken and stir-fry until the chicken is cooked. Add the cooked prawns and rice and stir to mix.
4.
Add fish sauce, sugar, pineapple, bell pepper and onion and stir through. Season and adjust the taste. Transfer to a serving plate and place the thinly sliced omelet on top.
5.
| Prep | 0:15 |
| Cook | 0:50 |
| Yields | 8 servings |
-
500 g of medium/long grain rice, super laser type is best
-
500 g beef, lamb, pork, or chicken thighs, cut in cubes 2 cm
-
1 big onion, rouglhy chopped parallel to the core
-
1 large bulb of garlic, outer dry layer peeled off
-
3 carrots, cut in tubes
-
2 tsp salt
-
1 pinch ground pepper
-
1 tbsp ground cumin
-
1 tbsp ground coriander
-
0.5 tbsp paprika
-
0.5 tbsp whole cumin
1.
Add oil to a pot (fill up to 0,5 cm from the bottom). Heat to medium high.
2.
Fry meat until browned.
3.
Add onion, spices (but salt and pepper), and fry until onion is browned.
4.
Place a garlic bulb im the middle and spread the carrots over the meat and don’t mix.
5.
Pour water until the water level reaches the bottom of the carrots. Season with pepper and half the salt.
6.
Simmer on medium low for 30 mins with the lid almost closed. During this time rinse the rise 3-4 times.
7.
Remove the garlic (set aside) and add an even layer of rice.
8.
Pour water through the ladle (in order not to make holes in the rice layer) over the rice until water layer is around 1cm over the rice. Add the rest of salt.
9.
Boil the water. Then reduce the heat to medium and let it sit until the rice is no longer submerged in water.
10.
Insert the garlic back to the middle of the rice layer. Make some holes in the rice layer with the other end of the ladle to let the steam escape. Cover the plov, turn off the heat, and let it sit for 30 min.
-
300 g pork loin, thinly sliced cross grain and blanched in boiling water
-
100 g cucumber, cut into bite-sized pieces
-
100 g onion, cut into 1 inch-cubes
-
100 g tomatoes, sliced into 1 inch-sections
-
100 g sour pineapple, cut into 1 inch-cubes
-
2 tbsp vegetable oil
- 2 tsp finely chopped garlic
-
0.5 cup tomato sauce
-
0.25 cup vinegar
-
2.5 tbsp sugar
-
2 tbsp fish sauce
-
2 tbsp mild chili sauce
-
0.5 cup water
-
2 tbsp vegetable oil
1.
To make the sweet and sour sauce, add the vegetable oil into a skillet and heat over medium heat. Put in the garlic and fry until fragrant. Add the tomato sauce, vinegar, sugar, fish sauce, chili sauce and water and cook for another 10 minutes. Adjust the taste to sour, sweet and salty.
2.
Now heat the vegetable oil in a skillet over over medium heat, and stir-fry the onion until just fragrant. Add pork and pineapple and stir through.
3.
Add the cucumber, sweet and sour sauce and tomatoes. Increase the heat to high and stir-fry for another 2 minutes. Transfer to a serving plate.
-
Bell pepper can be added to this dish.
-
Prawns can replace pork; they must be blanched first.
-
Not all of the sauce is to be used if a milder taste is preferred.
| Prep | 0:15 |
| Cook | 0:05 |
| Yields | 2 servings |
-
2 tablespoons red curry paste
-
2 cups skim coconut milk, 1/2 coconut milk, 1/2 water
-
200 g (1) chicken breast, sliced
-
3 kaffir lime leaves
-
2 tablespoons fish sauce
-
1 tablespoons sugar
-
0.5 cup bamboo shoots, sliced
-
0.5 green capsicum, sliced
-
0.5 red capsicum, sliced
-
1 red chili with seeds removed, roughly sliced
-
0.25 cup Thai basil
-
2 tablespoons vegetable oil
1.
Cook rice.
2.
Heat the oil in a medium saucepan over medium-high heat.
3.
Add curry paste, and stir until the aroma is released.
4.
Pour in the coconut milk, mix well, and bring to a boil.
5.
Then add the kaffir lime leaves, fish sauce, sugar, bamboo shoots, capsicums, and chicken.
6.
Bring it to a boil, making sure the chicken is well done, about 5 minutes.
7.
Then turn off the heat and add Thai basil.
8.
Serve rice and red curry in different bowls, eat with fork and spoon.
| Yield
| 10
|
| Prep time
| 30 min
|
| Time
| 2 h 30 min
|
#### Ingredients
- 1200 g minced beef
- 50 g guanciale, cubed
- 125 ml milk
- 3 onions
- 3 celery sticks
- 5 carrots
- 75 g tomato paste
- salt, pepper
- warm water
#### Method
1. Cut onions, celery sticks, and carrots into small cubes. You can use a food processor (in batches) to make this faster.
2. Saute pancetta until translucent.
3. Add veggies, and saute for a couple of minutes.
4. Add minced meat.
5. Add tomato paste, milk, water, and let it cook at low heat for at least two hours. Stir occasionally.
6. Serve with tagliatelle (originally), or spaghetti (family favorite).
# Salads
# Fresh Zucchini Salad
Source: [FooDee](https://youtu.be/PYYGDgxJAps "https://youtu.be/PYYGDgxJAps")
[](https://krivis2.zygi.xyz/_detail/recipe/zucchini-salad.jpeg?id=recipe%3Afresh_zucchini_salad "recipe:zucchini-salad.jpeg")
## Ingredients
-
500 g zucchini
-
0.5 tsp salt
-
0.5 tbsp honey
-
1 tbsp vinegar
-
2 tbsp oil
-
a bunch of parsley
-
1 clove garlic
-
a pinch of black pepper
1.
Cut zucchini in rings. Salt it and leave in a bowl.
2.
Chop parsley.
3.
Finely chop garlic.
4.
Mix oil, vinegar, garlic, honey, salt, and pepper.
5.
Drain the liquid from the bowl.
6.
Mix zucchini with the test of ingredients.
7.
Let it sit in a fridge for 15 minutes.
-
750 g (3 medium sized) tomatoes
-
150 g (.25 of a large) cucumber
-
60 g (1 small) green capsicum
-
1 small red onion
-
0.5 tablespoon dry oregano
-
8 Kalamata olives, whole
-
100 g feta cheese
-
5 tablespoons extra virgin olive oil
-
(Optional) capers
1.
Peel and slice the cucumber. Cut tomatoes in wedges.
2.
In a medium-sized bowl, mix gently the tomatoes, the cucumber and the olives with 3 tablespoons of the olive oil and a pinch of salt.
3.
Put the mixture in a serving bowl/dish, cut the green capsicum into slices, onion in thin rings, and add the pepper and onion slices on top.
4.
Add the feta slice on top of everything and drizzle with the rest 2 tablespoons of olive oil.
5.
Sprinkle with the oregano and serve with freshly baked bread.
| Total time
| 35 min
|
| Yield
| 8 servings
|
### Ingredients
- 500 g potatoes, boiled
- 200 g carrots, boiled
- 250 g canned green peas
- 300 g pickled cucumbers
- 4 eggs, boiled
- 50 g pickled capers
- 125 g mayo
- 20 g (1 bunch) of fresh dill, chopped (leave one branch for decoration)
- 2 pinches of salt
- pepper
### Instructions
1. Boil potatoes and carrots. Ideally unpeeled. Once boiled let them cool, then peel them.
2. In parallel, boil the eggs. They should turn out hard. 7-10 mins should do the trick. Once boiled, cool them, then peel them.
3. Cut potatoes, carrots, cucumbers, eggs into small cubes. Use a [wire grid slicer](https://krivis.zygi.xyz/uploads/images/gallery/2023-12/779840800-max.jpg) to make this step more efficient!
4. Add all ingredients into a bowl, mix well.
5. Decorate with a dill branch.
# Snacks & Tapas
# Croquetas de Jamón
[](https://krivis.zygi.xyz/uploads/images/gallery/2024-02/cHQimage.png)
#### Ingredients
- 250 g of chopped serrano ham, finely chopped
- 1 onion, very finely chopped
Béchamel:
- 500 ml whole milk
- 100 g flour
- Frying oil
- Salt, pepper, muscat to taste
To coat the croquettes:
- Breadcrumbs(paniermehl)
- 2 eggs
- Frying oil
#### Method
1. Fry the onion until translucent.
2. Pour in the flour and mix well. Let it fry for a moment (constantly mix).
3. Pour in the milk. Put the heat slightly higher until the milk heats up (don't let it boil). Continuously mix until the sauce begins to thicken.
4. Add the ham, mix well. Set aside and let it cool down.
5. Prepare for coating. Beat the eggs in a bowl, then in a separate bowl pour in breadcumbs.
6. Scoop a big (half) tablespoon of the sauce, form a croqueta, coat it with breadcrumbs, then dip it in the egg, then coat again with breadcrumbs. Set aside.
7. Heat the oil (~180 C) on the pan for deep frying.
8. Put croquetas in oil, let it fry until golden brown, the flip aside and fry a little more until evenly colored.
# Soups
# Borsh (Elvyra's recipe)
From: Oma Elvyra
[](https://krivis.zygi.xyz/uploads/images/gallery/2023-12/img-5257.jpg)
Probably the tastiest variant of the classical Ukrainian beetroot soup.
| Prep | 0:30 |
| Cook | 1:30 |
| Yields | 6 servings |
-
2.5 l water
-
300 g pork meat with a bone
-
300 g raw beets, shredded, 600g = big beet
-
500 g potatoes, cut in cubes, 300g = big potato
-
1 tbsp canned beans, optional
-
140 g carrots, shredded, 140g = big carrot
-
140 g onions, finely sliced, 140g = big onion
-
90 g capsicums, sliced in thin stripes, 180g = one capsicum
-
2 tbsp tomato paste
-
4 tbsp vinegar
-
1 tsp sugar
-
3 tbsp of vegetable oil
-
3 bay leaves
-
1 tbsp salt
-
0.75 tsp pepper
-
1 tsp coriander
-
1 tsp dried leek
-
1 tsp dried oregano
-
1 tsp parsnip
-
2 cloves of garlic, finely sliced
-
1 bunch of fresh dill, parsley
-
1 tbsp sour cream
-
1 slice of black bread or toasted white bread
1.
Add water to the pot, drop in the meat. Bring it to boil and let it simmer for at least 50 minutes (the more the better).
2.
Cut the veggies. With the hand colander remove the stains of meat in the boiling pot.
3.
Drop in the beets and potatoes into the pot.
4.
Fry onions with carrots on medium heat until softened but not completely cooked through. Then add capsicums, tomato paste, vinegar, and sugar, half a ladle of broth from the pot, and fry for a couple of minutes more.
5.
Add fried ingredients and optionally beans to the pot. Season the soup with bay leaves, salt, pepper, coriander, leek, oregano, parsnip. Let it simmer for another 10 minutes.
6.
Add chopped garlic into the soup. Put it off the heat and let it rest for 10 minutes.
7.
When serving, pour the soup into a bowl, add the greens and then sour cream on top. Serve with a slice of (ideally black) bread.
-
1 Zwiebel, fein gehackt
-
1 Knoblauchzehe, gepresst
-
1 wenig Butter zum Dämpfen
-
300 g Speck, Bündnerfleisch- oder Rohschinkenabschnitte, klein gewürfelt
-
100 g Schinkenwürfelchen
-
0.5 Lauch, gerüstet, klein gewürfelt
-
1 Stück Sellerie, gerüstet, klein gewürfelt
-
2 Rüebli, klein gewürfelt
-
2 Kartoffeln, geschält, klein gewürfelt
-
2 Lorbeerblätter
-
100 g Gerste
-
2.5 l Bouillon
-
2 dl Rahm
-
1 Salz, Pfeffer
-
2 EL glattblättrige Petersilie, fein gehackt
-
1 glattblättrige Petersilie zum Garnieren
1.
Gerste lassen für mindestens 20 Minuten kochen
2.
Zwiebel und Knoblauch in der Butter andämpfen. Fleisch kurz mitbraten. Gemüse und Lorbeer mitdämpfen.
3.
Mit der Bouillon alles ablöschen, unter Rühren aufkochen.
4.
Suppe bei kleiner Hitze mindestens 30 Minuten unter häufigem Rühren köcheln lassen.
5.
Würzen. Rahm und Petersilie beifügen, in vorgewärmte Suppenschalen geben, garnieren und heiss servieren.
-
500 green beans
-
200 gr creme fraiche
-
Flour 1/2 table spoon
-
Stock
-
Fresh Herbs (dill, parsley)
-
Salt, pepper
1.
Rinse, remove the tails from the green beans and cut them in half
2.
Boil the beans for 12 minutes (in salty water)
3.
Meanwhile, take the creme fraiche and add slowly the flour to it so that there are no “komochki”
4.
Remove excess water so that the water only partially covers the beans
5.
Add stock, and slowly (spoon by spoon) add the creme fraiche.
6.
Add salt, pepper, and herbs to your taste. Enjoy!